How
I installed new brake pads on my 1999 528i with Sport Package (should be fine
for other E39’s)
By
Robert B.
Tools/Parts
Needed
v
New Brake Pads (duh)
v
Brake pad shims and/or anti-squeal compound, if desired
v
Jack/Jack Stands/Floor Jack or Hydraulic Lift (if you
have lots of money)
v
7mm Allen Wrench
v
Heavy-Duty C-clamp
v
Small, flat-head screwdriver to remove wheel caps
v
Larger flat-head screwdriver to remove the anti-rattle
clip
v
Lug wrench
v
Brake Cleaner spray
v
Clean container for holding lug nuts and such
v
Brake fluid (you shouldn’t need it but you never know)
v
Rags
v
Optional:
Ø
Knee Pads!
Ø
GoJo or some similar product to clean your hands
Step
1 – Find a nice, roomy area to work on your car.
Step
2 – Take a good look at your new pads if you have never seen brake pads
before
Step
3 – Pop the hood and loosen the brake fluid reservoir cap.
You might want to put a rag around it as a little brake fluid may come
out later. FOR INSTRUCTIONS ON ACCESSING MASTER CYLINDER CLICK
HERE .
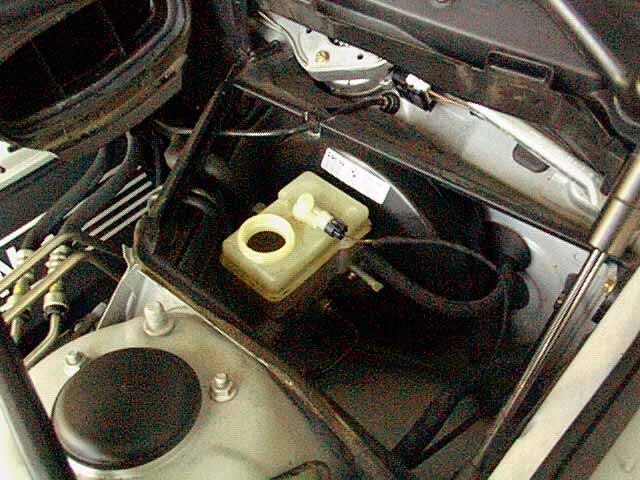
FOR
INSTRUCTIONS ON ACCESSING MASTER CYLINDER CLICK
HERE
Step
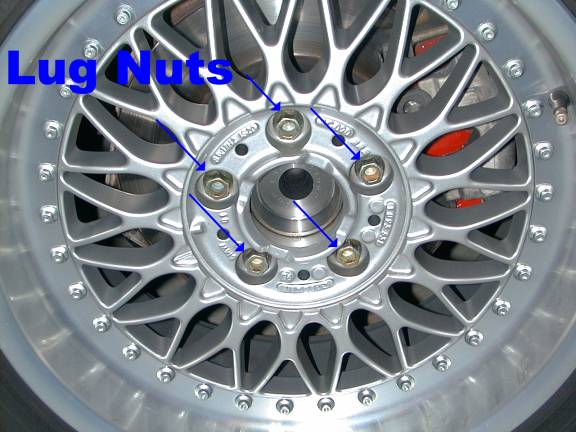
4 – Remove the wheel cap with the small flat head screwdriver (or by hand if
you can) and loosen the lug nuts about ¼ turn each
Step
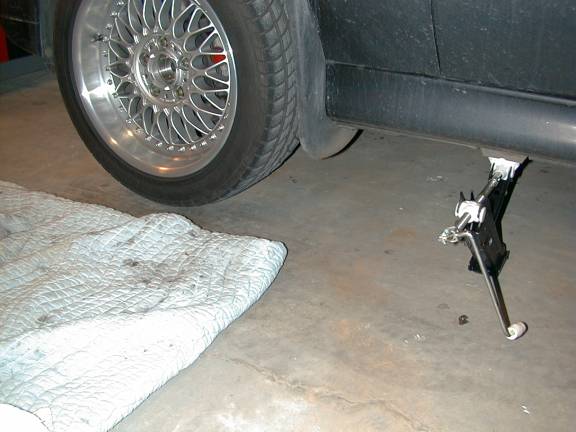
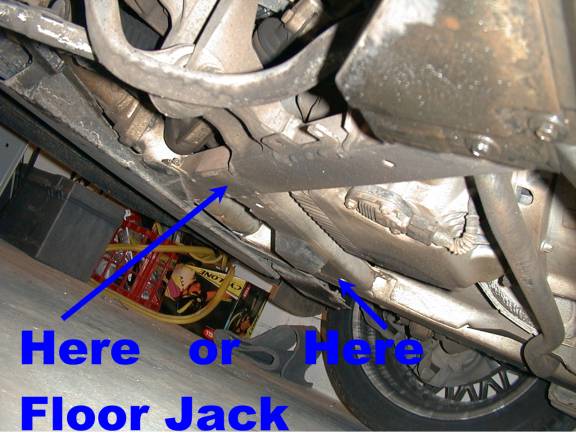
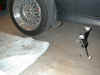
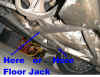
5 – Jack up the car with the BMW-provided jack.
Refer to the owner’s manual about where the jack touches the car
body. Place some jack stands under
the frame, or if yours are too tall (like mine), use a floor jack to provide
additional support. I started with
the left front wheel/side. Jack
the car just high enough so that you can barely turn the wheel.
The higher the car, the higher you have to lift the wheel to put it
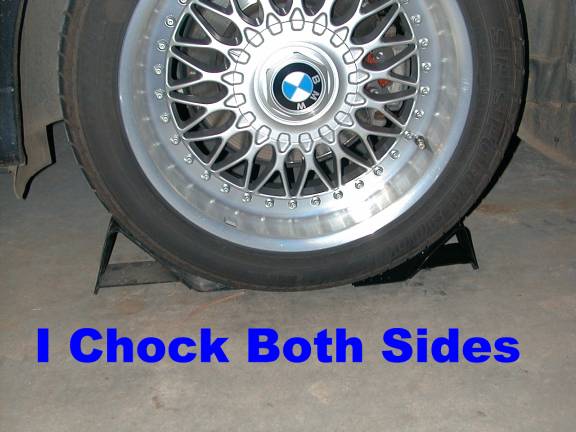
back on! Chock the wheel on the
other end (same side). Since I
have raised the left front, I chock the left rear.
Once your car is up in the air, try to avoid opening the doors.
Once my last 528 got to be 10 years old, you could tell a difference
opening and closing the doors while the car was jacked up.
I’m guessing this was due to the frame flexing.
Step
6 – Finish removing the lug nuts, wipe them clean, and store them in the
clean container. Remove the wheel
and set aside. Don’t clean the
wheel yet, you’ll have time for that later.
Step
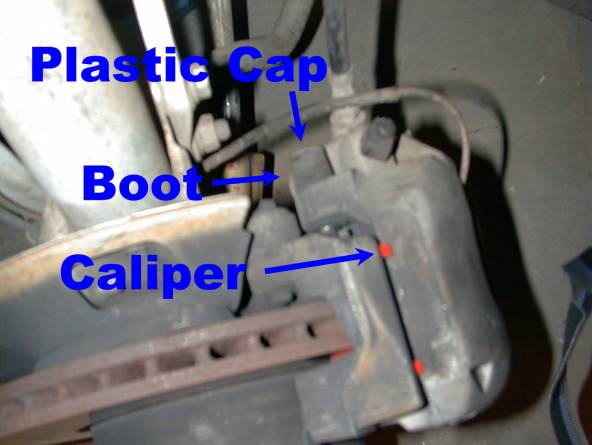
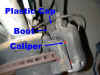
7 – Locate the caliper assembly. On
the engine side of the assembly, you will find two, small, cylindrical, rubber
boots about the size of half your thumb (one on the top, one on the bottom).
Each boot has a small plastic cap on the end.
Remove the caps, wipe them clean and store them in the clean container.
Do not use brake cleaner on the caps!
These boots and caps keep dirt away from the caliper bolts.
The caliper slides back and forth on the caliper bolts, so it is
important to keep them clean.
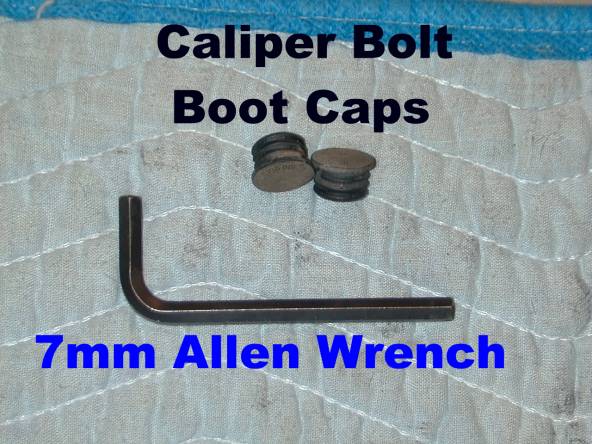
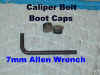
Step
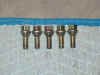
8 – Inside each of these two boots is a single caliper bolt.
Use the 7mm allen wrench to loosen and remove the bolts.
The bolts may be stubborn, so remember: Lefty Loosy, Righty Tighty.
Wipe the bolts clean and store them in the clean container.
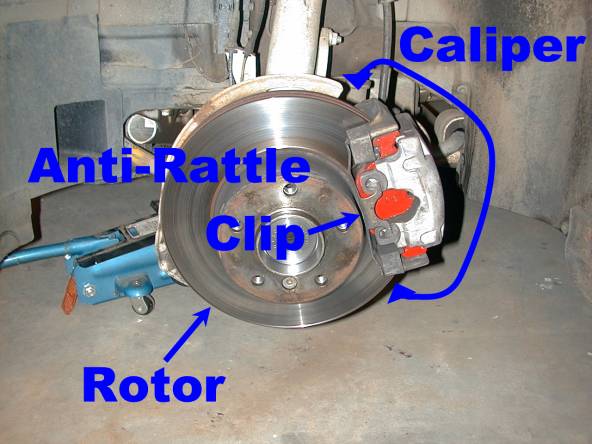
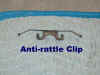
Step
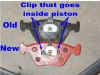
9 – Use the larger flat-head screwdriver to remove the anti-rattle clip.
If you put the blade of the screwdriver between the clip and the center
of the rotor (the hub?), you can pry the clip away from the center and pop it
out. Be careful, it might go
flying! I keep one hand over the
clip to stop any aerobatic maneuvers. I
value my eyes and my paint. Clean
it and store it in the clean container.

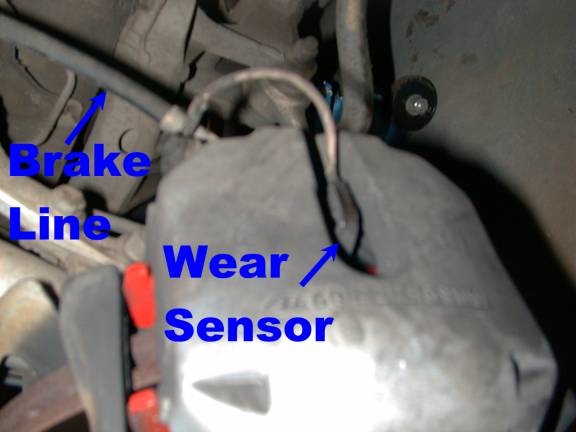
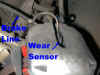
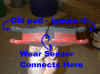
Step
10 – Use the needle-nose pliers to gently disconnect the brake wear
sensor from the caliper. Be
careful not to lose the little metal clip (see caliper bolt picture above)!
Do not work the connector “back and forth” or “side to side”.
These things are easy to break.
Wear sensors were only present on the left front and right rear of my
car. If you cannot find the little
metal clip, it might be stuck on the brake pad.
We’ll get it later.

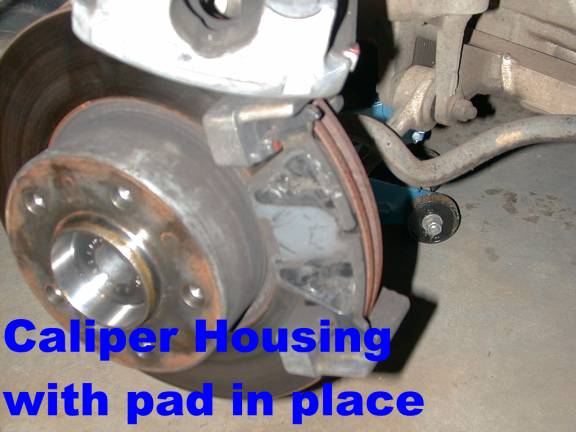
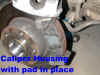
Step
11 – Remove the caliper. It may
take some work. Be careful not to
put unnecessary strain on the brake line.
At this point, you should be able to see two pads: one inside the
caliper, and one “on the wheel”, loosely held in place by the caliper
housing (or whatever it’s called, caliper bracket?).
Note the orientation of the pads. Remember
that orientation when you put in the new pads!
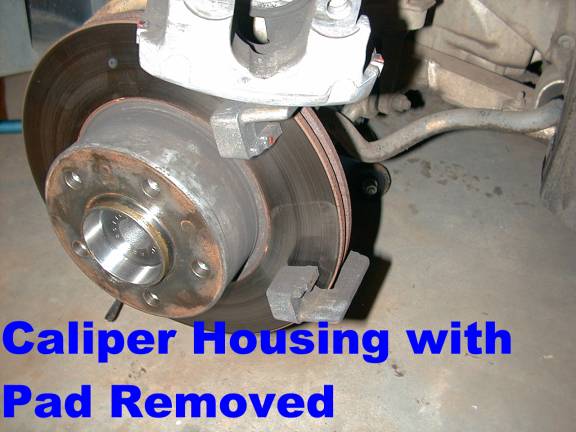
Step
12 – Remove the pad that is still “on the wheel” in the caliper housing.
It should come right out/off. Leave
the other pad that is inside the caliper in place for the moment.

Step
13 – Find a way to support the caliper.
I simply rested mine on top of the rotor.
You don’t want to leave the caliper hanging by its brake line while
you do the next steps!
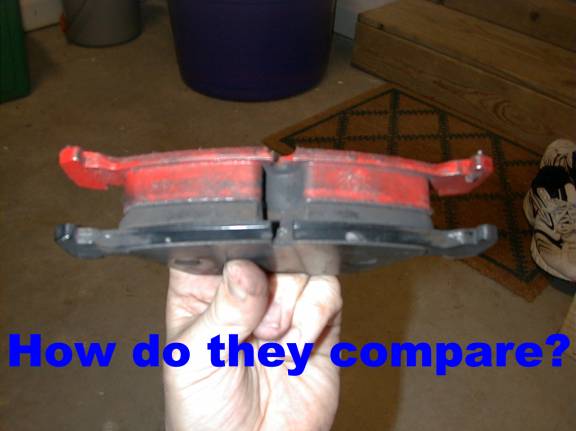
Step
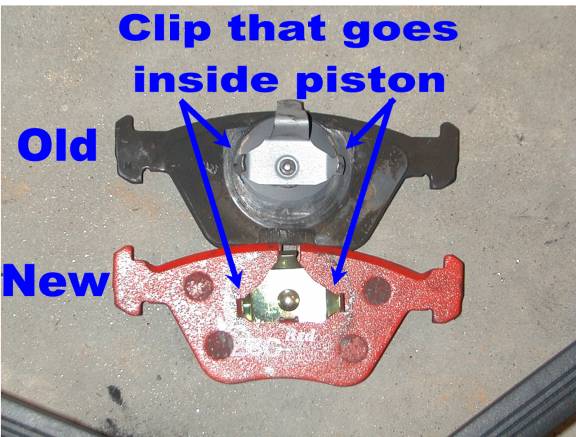
14 - VERY IMPORTANT: Compare the size and shape of the old and new pads.
Everything should be almost exactly the same, except the thickness of
the pads. New pads should be
thicker than old pads. If they are
not the same size and shape, you’ve got the wrong pads.
The pads I got appear to the same size below.
Step
15 – If you’ve got the right pads, now is the time to apply the
anti-squeal compound. The stuff I
used was a thick liquid (about like Elmer’s glue) that dried to a
gooey/tacky semi-solid. Apply a
thin coating of the compound to the BACK of your pads.
Do not get any on the front (the part which makes contact with the
rotor). I applied mine to about
the thickness of a piece of cellophane tape.
Also – do not put any on the spring clips.
You probably want to go ahead and do this to all of the new pads at the
same time. KEEP THE PADS CLEAN!
If
you are using shims instead of compound, go ahead and put the shims on.
They usually have an adhesive that sticks them to the brake pad.
Be sure all parts are clean before you try and stick them together.
If your shims do not have an adhesive, I SUPPOSE you could you a VERY
thin layer of anti-squeal compound. It
sorta gets tacky like rubber cement.
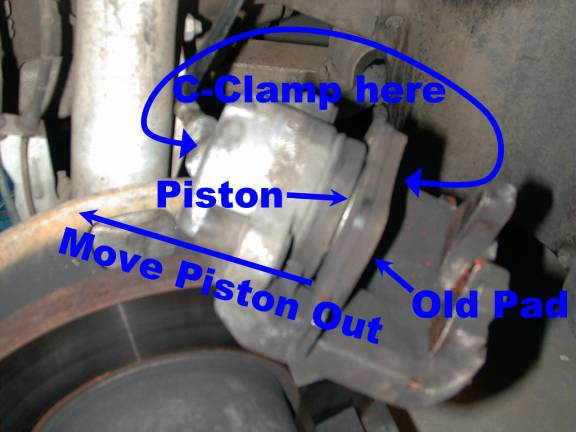
Step
16 – While the compound is drying, clean your wheel.
Step
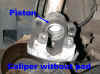
17 – While the compound is still drying, use the C-clamp to push the brake
piston out. You need to do this to
make room for the new pads. Put
one part of the clamp up against the old brake pad that you left in place
(this protects the piston itself), put the other part of the clamp on the back
side of the caliper, being careful not to clamp the brake line.
Tighten the clamp to work the piston out as far as it will go, but don’t
over-do it.

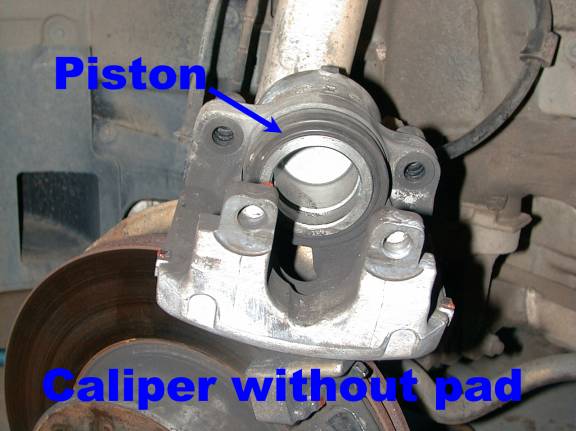
Step
18 – With the piston moved out, remove the inside brake pad and clean the
caliper assembly. If you could not
find the little metal clip earlier, look for it in the u-shaped notch on the
metal plate of the brake pad.
NOTE:
At this point, some people recommend using some fine-grit sandpaper to “score”
the surface of the rotor. Start
from the center and move out to the edge (like slicing a cake).
This scoring supposedly helps the new pads mate to the rotor.
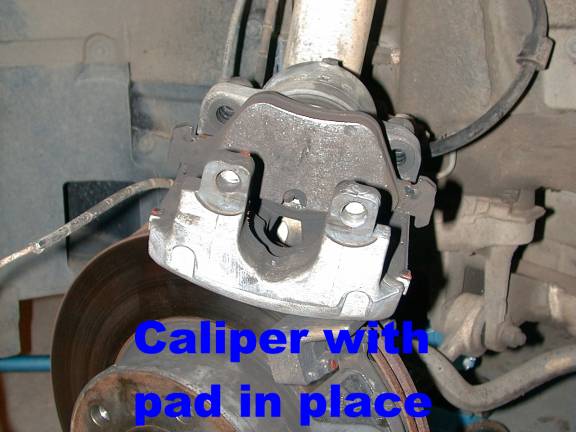
Step
19 – Insert the new pads being careful to orient them properly.
The pad with the clips on the back goes in the caliper.
The clips should fit snugly inside the piston.
I had to spread the clips a little to get a snug fit.
Step
20 – Replace the caliper. It
should slide into place pretty easily, unless you did not get the brake piston
pushed back far enough.
Step
21 – Replace and tighten the caliper bolts.
If you can’t get the bolts in, then you don’t have the caliper
fully in place. I don’t know the
torque setting for these bolts, but I don’t have a torque wrench anyways.
Remember how hard they were to get off, tighten them up that much!
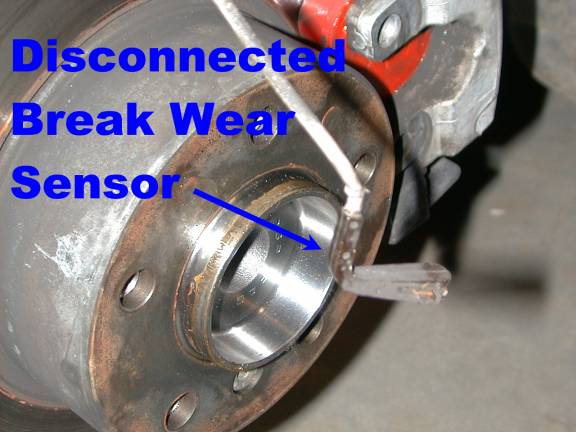
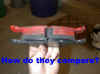
Step
22 – Re-insert the plastic caps into the caliper bolt boots.
Step
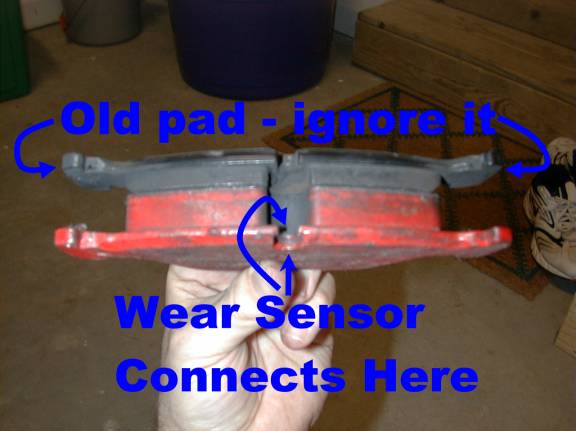
23 – Reconnect the brake wear sensor (CAREFULLY).
The sensor goes into the groove of the metal plate of the pad that is
in the caliper (the pad closest to the engine, the pad with the clips).
You can’t connect it to the wrong pad, but you can put clip the
sensor in the wrong place. Fortunately,
if you get it in the wrong place, it will come out very easily.
Check to make sure the sensor does not come out easily!
The picture below shows the (wrong) pad outside of the caliper
to illustrate where the wear sensor connects.
At this point in the process, the pad should be snug inside the
caliper, though, not sitting in your hand.
Step
24 – Replace the anti-rattle clip. I
can’t recommend how to do it. Have
fun with that on your own.
Step
25 – Reinstall the wheel and lug nuts. Tighten
them with the lug wrench, but DO NOT try to fully tighten the lug nuts while
you have the car jacked up. You’ll
rock the car off the jacks. Wait
until the wheel is on the ground to fully tighten the nuts.
Step
26 – Lower the car, tighten the nuts, replace the wheel cap.
There is a definite “system” for properly tightening lug nuts.
If you sequentially number the lug nuts around the wheel, you would
tighten then in 1-3-5-2-4 order (in effect, drawing a star).
Then re-tighten 1and 3.
Remove
and replace the other pads following the same steps and then tighten the brake
fluid reservoir cap.
It
took me three hours the first time I did this.
Once
you have the pads replaced and the car back together, you should try to “bed”
the pads. Consult your parts
dealer for the pad manufacturer’s recommended procedure for bedding.
I remember that Raybestos recommends 8 to 10 medium-pressure stops from
40 MPH. I have seen other
recommendations that require a whole series of stop from progressively faster
speeds. It is best to do this
where you can drive for a few minutes at a constant speed (no stopping) after
you have done this. This will
allow the brakes a chance to cool off. Deserted
highways/back roads are great for this.
In
either case, when you are first driving, BE VERY CAREFUL.
You may have done something wrong, and/or some foreign material may be
on the surface of the pads that keeps them from working well initially.
Don’t drive aggressively, and leave yourself plenty of room to stop.
Also
– when you first start the car after replacing the pads, pump the brake
pedal a few times until it feels “normal”.
The pedal may go all the way to the floor the first couple of times you
press it. This is normal.
Questions
I have about all of this:
v
Should you lightly grease the non-threaded areas of the
caliper bolts before you re-install?
v
Do you need shims?
v
Do you need anti-squeal compound?
v
Does anything else need lubricating?
v
What do you do with the old pads that is environmentally
friendly?