How to Replace the Trunk Lock
Actuator on an e39
Please note that
the following instructions are for entertainment purposes only. Proceed at your
own risk. By attempting this or any repair on your car, you may void your
warranty or cause extensive damage to yourself or the car or you might even get
leprosy! How bad would that be?
Special thanks to you guys and gals on bimmer.org
especially Agent99 and Jim Cash.
Time Needed: 15-30 minutes
max.
Skill Level: Easy
Parts
Needed:
| Trunk Lock
Actuator (67.11-8 377 569) |
$32.40 from
Pacific BMW |
| Trim Clips (Just
in Case) |
Less than 50
cents at Pacific BMW |
| Paint can
opener |
Lowe's? Home
Depot? Or you can bend a paperclip into a paint can opener-esque
shape. |
| Screwdriver |
Use the one from
the trunk toolkit |
| T25 Torx
driver |
Get one from Pep
Boys, Autozone, Sears, etc. |
Taking off the Panel:
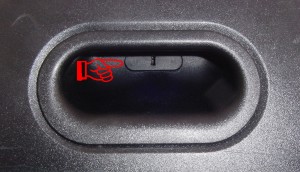
1) First you need to pop open
this screw cover. Use a paint can opener. Or use pliers to bend your paper
clip into a similar shape. Just stick in the hook portion and pull down...
It doesn't take that much force. Estimated 2 lbs force.
2) Remove the philips head screw
underneath.
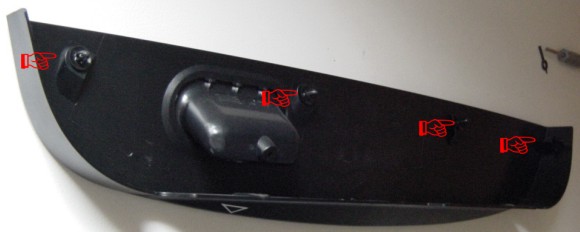
3) Pull out the two plugs that are facing you (same
side as where the lock mechanism is sticking out) with either your
fingrenails or a small screwdriver. (Thanks again, Agent99. I'll update
the picture this evening.) Next, there are four clips attaching the black
plastic trim to the sheet metal of the trunk. These clips are pointed at
below. It takes a little extra tugging to get these off. Just use both
hands, one hand on each side of the clip and do a gentle but firm pull.
I'd estimate about a 5-8 lbs force is necessary for each clip. |
 |
 |
| 4) Okay, so now you have
the trim pulled out, it's time for the beverage of your choice. That was
the hardest part, btw. |
Removing Trunk Actuator from
Assembly:
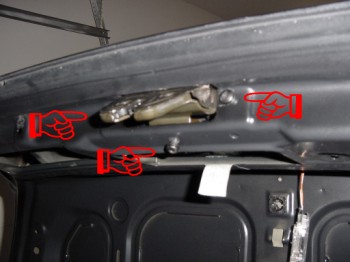
5) Remove the three T25 Torx
screws from the trunk lock. These are pointed at to the right.
6)
Unhook the actuator and remove the wiring harness.
7) Remove the remaining two screws to seperate the
lock mechanism from the trunk actuator. |
 |
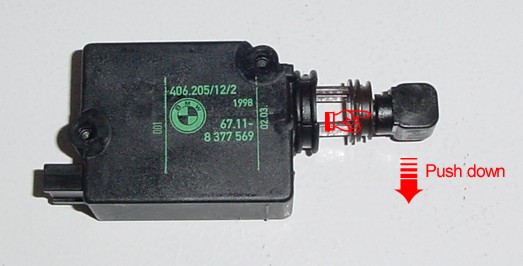
8) Detach this piece
of plastic over from the old actuator to the new one. To remove, just
push it down with about 1-2 lbs of force. See the picture below:
9) That's it! Reassembly is the reverse of
disassembly. Remember to be gentle but firm when pushing in the clips. I
actually broke one clip because I couldn't force it back in. No big whoop.
They're like either 18 or 50 cents from Pacific BMW. Just order a few
before you start the job. |
Project Notes:
| You see that in one photo I
also took off the felt trim part that the toolkit is attached to. That is
completely unnecessary. |
UPDATE by
DKFS July 2003
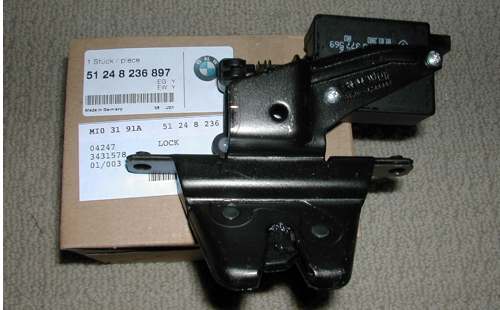
1) The part number
listed has been superceded....The new part number is:51 24 8 236 897 Trunk Lid
Catch (List price $100.80)
You can no longer
just buy the actuator, you must buy the actuator and latch assembly. Note, the
part number on the actuator itself is the same as listed on bmwtips, so it is
not likely a new and improved one. Probably agood way to move excess inventory
of trunk latches and generate extra margin.
2) The part number for the trim clips are not listed. It is, 51 49 8 123 832
Clip (List price $1.56)
3) I needed at
T27 Torx Driver, not a T25
4) There is no
mention of the connection rod from the lock mechanism that is hooked to the
latch assembly.
In the picture above, look on label where it says "lock". Directly
to the right there is a little hole, that has a white plastic grommet in it.
That is the receiving hole for the connection rod. It must be unhooked before
the latch can be removed, and obviously reconnected when reassembling otherwise
you wont be able to use the key to open the trunk.
5) Here's the bummer....
Replacement should be a snap since you should be able to swap the entire latch
assembly, but no....I found that the holes for the mounting screws are tapped
slightly smaller that the screws that were currently on the car.
The old screws will not thread into the new bracket. So I had to take the new
actuator off the new latch assembly and put it onto the old one. I guess if
you have T25 screws, this step might not be necessary.
6) Swapping the
actuator is easy Just remove the two Phillips head screws and the actuator comes
off the
latch assembly. In
this case, this step is unnecessary. There is no need to reuse the plastic receiving
hook as shown in this picture as the new actuator already has one.