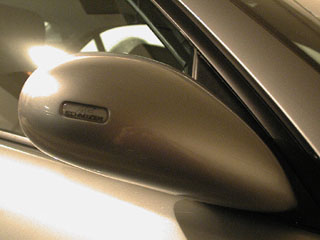
AC Schnitzer Sport Mirror Installation
By Greg C
Mirrored from http://www.geocities.com/bmw540isport6spd/
| Pictures | Instructions |
|
|
Equipment Needed: 1. Large flat head screw driver. 2. Medium flat head screw driver. 3. Small flat head screw driver. 4. Philips head screw driver. 5. T-30 hex bit. 5. Hex bit. |
 |
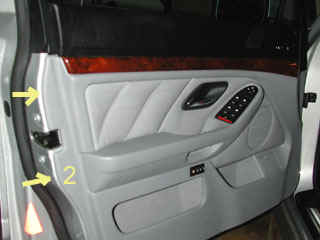
1. Remove
cover tab.
2. Unscrew the screw underneath cover. 3. Save and set aside together. |
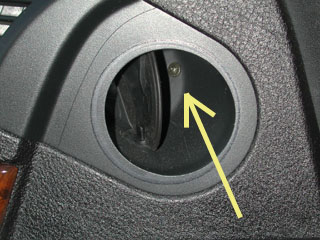 |
1.
Remove the screw here.
2. Set aside and save 3. This helps to release the door paneling. |
 |
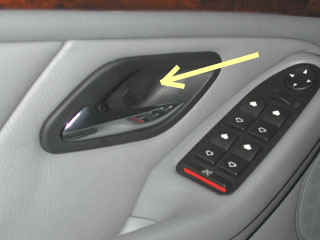
1.
Use a flat screw driver to gently pry the window switch from
its casing (this is the passenger side. The driver's
side is similar. See next picture.).
2. Note: cover and screw removed in door unlocking lever area. |
 |
1.
Use a flat screw driver to pry the clips from the metal part
of the door. This begins to remove the door panel.
2. At #2 there are two clips to unhook. 3. The clips remain attached to the door panel. 4. Once all the clips are separated from the door, lift and pull the panel to separate the panel from the window sill. The panel separates from the window sill by prying toward you. 5. Dead center of the panel, there is a clip. Keep pulling the panel to get it completely off. (Not sure which way. Keep jiggling). Caution: Watch for the door lock pin. |
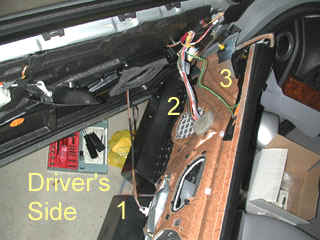 |
1.
#1 Power cable for the seat memory buttons.
2. #2 Power cables that go to the driver's master window switches. 3. #3 Unhook the green cable from the door, not the panel. 4. The passenger side is similar. |
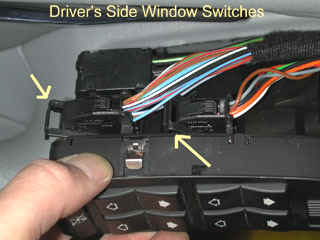 |
1.
Flip the levers to release the two connectors shown with the Yellow
arrows (Driver's side). The passenger's side is
similar.
2. The right-most power connector: Release the inner connector from the outer connector Use a small flat screw driver to widen the outer connector and pull on the wires of the inner connector to separate the two. |
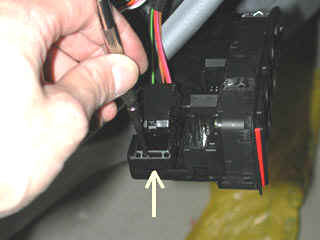 |
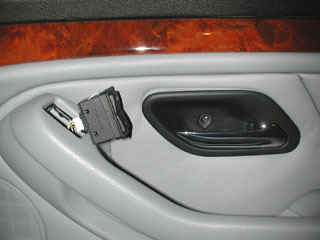
1.
The main power connector is released by inserting a small flat
ended screw driver and pulling toward you. This allows
easy release.
2. Set aside the master switch. |
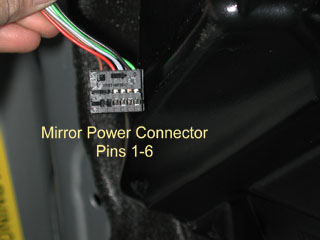 |
1.
This is one side of the inner connector. Use a small
flat ended screw driver to remove the metal connectors from
the inner plastic housing by pushing on the small metal tabs
at the base of the connectors (toward the bottom of the
picture).
2. Slot #6: Green; Slot #5: Black; Slot #4: Grey; Slot #3: Red. |
 |
1.
This is the other side of the inner plastic connector.
Remove the wires and metal parts from the inner connector.
Set aside and save plastic housing
2. Slot#12: Orange; Slot #11: Pink; Slot #10: White; Slot#7: Brown |
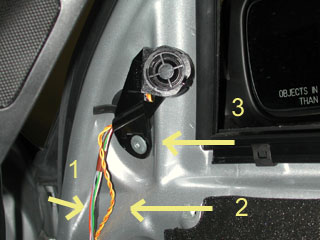 |
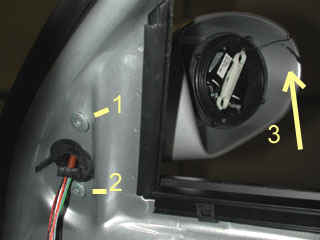
1.
The cover to the tweeter is simply removed by prying the trim
toward you.
2. #1 is the wires that power the mirror. #2 is the speaker wires (leave alone). #3 is the T-30 screw that needs to be remove (this is 1 of 3). Save the screw. 3. The 2nd T-30 screw is then visible when removing the tweeter from the metal door. Remove and save this screw (2 of 3). |
 |
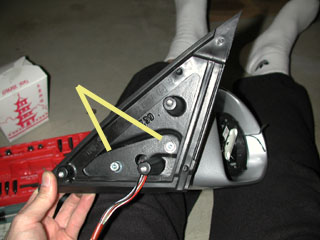
1.
This is the location of the 3rd T-30 screw. #1 arrow
points to the corner of the door where it begins to meet the
main body. Peel up the rubber seal to expose the corner
of the door and the 3rd T-30 screw. Note: the
prongs and corresponding holes to reattach the rubber seal
properly later.
Remove and save the 3rd T-30 screw. 2. #2 is the plastic trim that has the tweeter mesh grill. 3. Note the rubber accordion shape tubing. The mirror power wires run through it. After removing the 3rd T-30 screw, the whole stock mirror housing and bracket can be removed. You should be able to thread the wires through the rubber accordion tubing. |
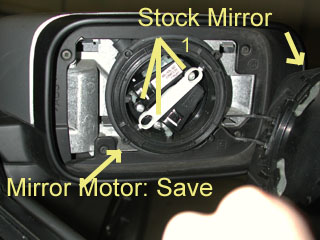 |
This is
the passenger side. It is the same as the driver's.
1. The stock mirror is released by pushing to the right as far as possible, thus releasing the left 2 clips. Then push the mirror to the left to unsnap the right side. Note the positions of the two black wires that keep the mirror from being totally remove. Remove the two black wires. 2. At #1 unscrew the screws that hold the motor to the mirror housing. Remove the motor and save. 3. Note the orientation of the screw pattern!!! 4. In order to thread the wires out to release the motor from the stock housing, remove a small 1.5"x1.0" plate at the bottom where the mirror housing connects to the metal bracket. Feed the wires toward the housing and retrieve the motor. You don't have to cut any heat shrink wrap. |
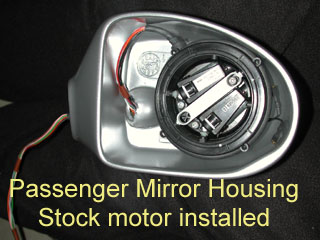 |
1.
The ACS Housing. Under the stock motor seen here is the
plastic white base. It has the same orientation for the
motor mounting screws as the stock mirror housing. Use the two
screws supplied to attach the base to the housing. Then
using 3 supplied screws, attach the motor to the base.
Note the same 3 screw orientation as above.
2. Thread the wires through the hole shown here. |
 |
1.
Attach the mirror mounting plate to the ACS mirror housing
using two screws supplied with the kit.
2. Thread the wires through that middle hole. |
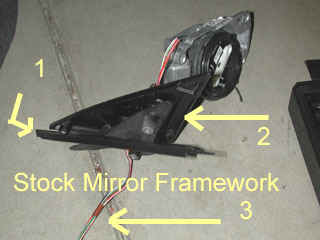 |
1.
Retrieve the triangular rubber seal from the stock mounting
bracket (#1). Install it on the periphery of the ACS
Bracket.
2. Also retrieve the triangular foam piece from the stock mounting bracket (#2). Install it in the ACS Bracket. 3. #3 is the wires of the mirror. |
 |
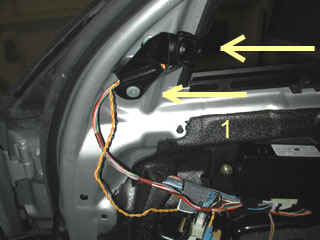
1.
To mount the ACS mirror housing and bracket, screw in the
stock T-30 screws all except for #2 in picture. #2 is
screwed into place after the tweeter is attached to screw #1
in the picture.
2. Note #3. Those wires attach to the mirror. These wires heat the mirror to defog them. 3. Attach the new ACS mirrors to the defog wires and snap the mirror into place, similar to removing the mirrors. 4. Note the accordion rubber housing is placed back into place. No heat shrink wrap needs to be cut. |
 |
1.
Screw in the last of the T-30 screws (#1). Seat the
tweeter at the top most T-30 screw first. Then fasten
the 3rd.
2. Place the tweeter cover back. Snap the plastic cover back into place. |
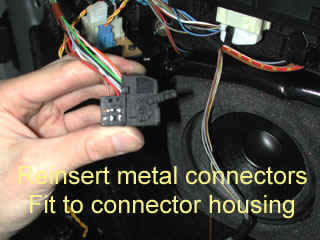 |
1.
Reinsert the wires accordingly into the inner plastic house
set aside earlier.
2. Reinsert the inner housing into the outer plastic housing. 3. Plug the connector back into the original spot. |
|
1.
Reattach the wires to the door and vice versa.
2. Before remounting door panel, check to see if the mirrors function properly. The passenger mirror should tilt downward when the car is in reverse. 3. Remount the door panel by hammering the door panel with the bottom of your fist. The window sill area is pushed into place. Make sure you insert the door locking pin through its corresponding hole. 4. Place back window switches. 5. Place the appropriate ACS Sticker in its spot. 6. Any extra unknown parts? Hope not!!! 7. Hope this helps out. Installation took me about 4 hours because I was taking pictures. Once you finish one, the other side is much quicker. This may apply to all aftermarket sport mirrors (ACS, BMW, Hamann, and Racing Dynamics). |
| Comments or questions, email me: | BMW540iSport6spd@yahoo.com |