Speaker Locations and Directions
(archive link: http://www.bimmer.org/5series/messages/archive/msgsy2000w52/13119.html)
Posted by Brian Lewis (00 540iA
Sport) on December 31, 2000 at 10:14:47:
In Reply to: Stock Speakers
and silly fold down seats. posted by Mark Leidlein on December 31, 2000 at
09:43:47:
(posted from: cx603945-d.ldra1.occa.home.com
(24.9.139.126))
Front Speakers
Front Speaker Installation
Well, now it's time to get to the speaker installation. Overwhelmed yet? It's
really not that big of a deal, especially since I've got all these nice pictures
here to show you what to expect. Repeat these steps for each front door.
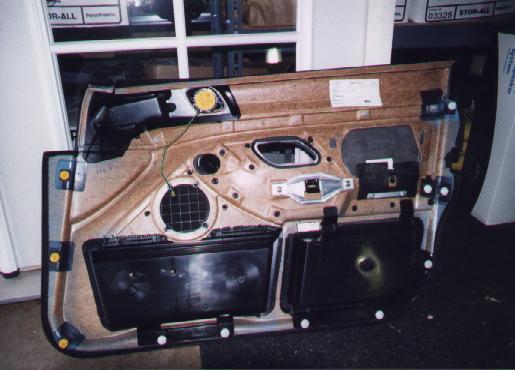
Door Panel Removal - Steps
- Remove screw from inside forward vent flap (very important you do
this first to prevent cracking the vent)
- Remove screw behind door handle (pop off cover plug first)
- Remove window switch (pry out with micro screwdriver, pull out and
disconnect wire connectors)
- Remove lamp unit from bottom of door and disconnect wiring. Pry
out with micro screwdriver from the front-most edge.
|
- The entire lower portion of the door panel is fastened with
plastic push in clips around its perimeter. Use a long flat
screwdriver (or similar) to pry the panel away from the door at each
clip point. Start at the outside upper edge just above and below the
opening for the lock (striker). Look for the next clip point and pry
as close as you can to it. Be careful at the lower outside area -
the clips are mounted on the rear of the plastic storage box (not on
the panel). You have to push the screwdriver in all the way to the
box and pry on it as opposed to prying on the edge of the panel -
otherwise you can end up prying the panel off the storage box.
|
|
- With the lower panel clips all free, pull out slightly on the arm
rest handle and then twist and slip the door handle unit back
through the opening.
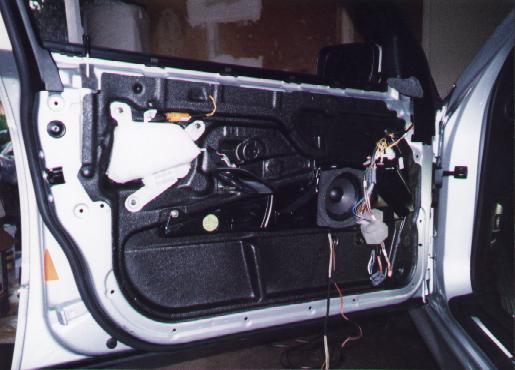
- Now pull the entire door panel slightly outward at the bottom and
then lift upward - may take some wrestling to free it at the
connectors by the window. Before removing the door panel reach in
and disconnect the midrange speaker wiring connector.
|
|
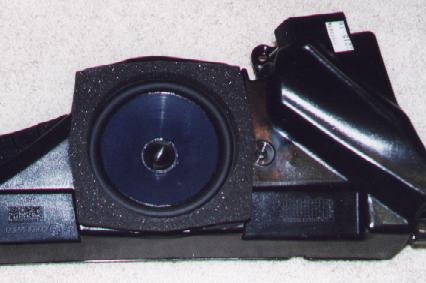
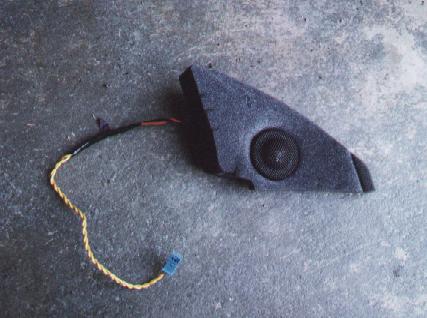
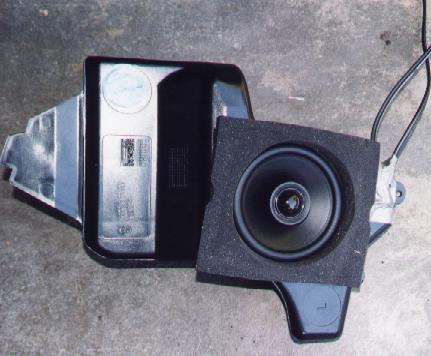
Woofer Replacement
- Carefully pull the foam surround away from the speaker.
- Using a small allen wrench, remove the (4) retaining screws - one
at each corner.
- Disconnect the (4) wires from the woofer and remove the driver.
- NOTE: The woofers in the doors are dual voice-coil woofers. One
coil is used for the stereo system, the other is for the cellular
phone. DO NOT TWIST THESE WIRES TOGETHER AND USE BOTH PAIRS. I know
this because that's what I tried and got hosed. If you wire it this
way you'll get mono cross-talk between your left and right channels
and the impedance rating for your amp will be all wacked out of
joint - not a good thing. I believe the correct pair to use is the
shorter one, but double check it using your DVM. I removed the
crappy poly fill and replaced it with the good stuff I bought for my
sub. Not sure it makes a difference, but seemed like a good idea at
the time.
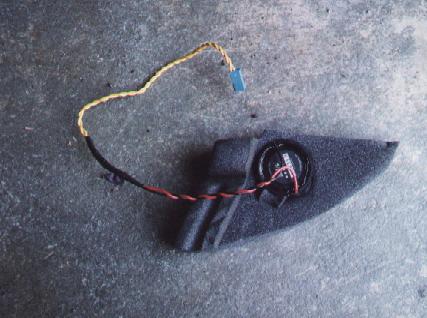
- Use the supplied weather stipping and affix it to the back of the
new woofer frame before mounting. This will insure an air-tight
seal. Be sure to route the wiring for the woofer down in the bottom
of the sound-box. The new woofer magnet is deep and the driver will
not seat correctly if the wiring is behind the magnet.
|
- Use the short screws for remounting the woofer in the sound-box.
The holes will not line up, but that's ok. Be sure not to over
tighten the mounting screws (if you have the 335is speakers) because
you will crack the surround. It's a tight fit, so be sure the
connectors do not get disconnected while you're wrestling with it.
- Reattach the foam ring to the new woofer.
|
|
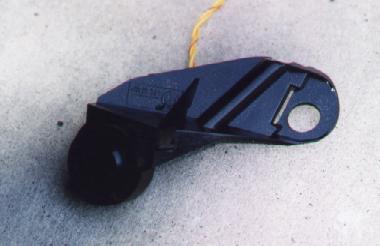
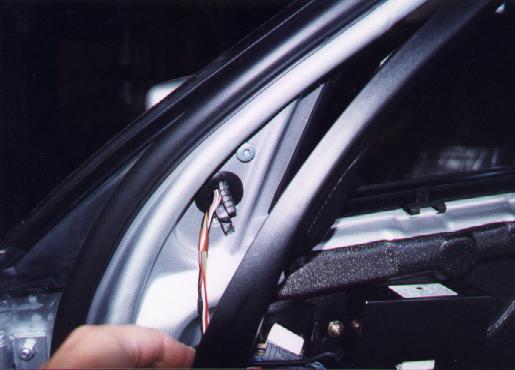
Tweeter Replacement
- Remove the retaining bolt from the tweeter assembly.
- Pull the plastic moulding out and remove the tweeter. DO NOT
ATTEMPT TO REMOVE THE GRILL.
|
|
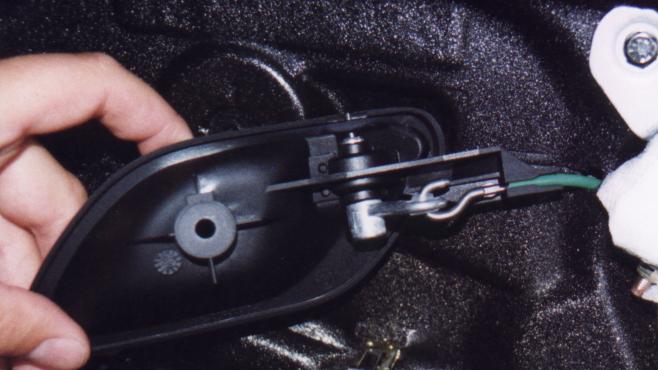
- Cut the wires from the factory tweeter. Leave enough wire on the
old tweeter in case you want to reinstall it at a later date.
- Splice the new tweeter's connections to the remaining piece with
the connector on it. I don't remember which lead is positive, so
test this with your DVM.
- Remove the foam from inside the tweeter cavity.
- Cut two small slits in this foam and fit the new tweeter inside
the hole.
- Replace the foam/tweeter assembly and put the moulding back in
place. You will not be able to bolt the new tweeter in. It's
sufficient to just let the foam hold it there.
|
|
Reassembling The Door
Some things you'll need to know first.
- Get someone to help you do this. It's much easier if one person
holds the panel while the other feeds the wiring and aligns the
clips for reinstallation.
- Visit your local BMW dealer and buy some extra clips. I broke a
few of mine during removal. They're pricey little buggers, but
you'll probably need a few. They're the yellow ones.
- There is a plastic clip that fits into the metal channel behind
the arm rest. That clip must be in place as you remount the door -
it slides over that metal prong on the door. Be careful that clip
does not drop out.
- Double check that the cable from the door handle is fully within
it's plastic slot. If it slips out when you are pulling the unit
back through the door you will find there is some slack in the
handle - once you have it all back together - then you have to pull
it off again.
- Jim recommends putting some silicone lubricant on all the contact
points, including around the outside of the door panel - keeps away
the creaks and squeaks. He also used some silicone caulking to seal
up any gaps in that plastic noise/weather panel.
|
|
Steps
- Thread wires back into location for window switch, midrange
speaker and lamp before you push the door panel on
- Push lock button down and fit door panel over button
- Push top panel back into clips at window - just thump them to lock
into position.
- Make sure you pull the wire for the window switch all the way out
of the handle - otherwise it might get caught across the front of
the woofer.
- Now press the lower part of the door into position - onto that
metal pin behind the arm rest.
- Checking that each clip is over it's corresponding hole just push
each clip into place around the door edge. You'll hear a definite
snap sound when they're in place.
- Check your door handle to make sure it operates properly.
- Put the screws, switch and light back into place and that's it.
|
Rear Speakers
Rear Speaker Installation
If you thought the front door speaker installation was fun, wait until you get
into this! Basically you're going to remove the entire rear deck and rear seat.
My car has the split-fold rear seats and no rear sunshade, so keep this in mind.
Rear Deck Removal
NOTE: Be sure your hands are clean when removing the C-Pillar trim panels.
Steps
1. Remove lower rear seat by pulling up hard at the base of the seat in front of
the two outside seating positions. Cover the brackets on the floor that protrude
up into the lower seat (to prevent them marking the seat backs when they are
folded down (which you do next)
2. Remove the seat back side bolsters (get fingers behind them at the top and
pull out ) This is a hard pull and the bolsters are still attached with a bolt
at the bottom, but they will swing out far enough so that you do not have to
take out that other bolt.
3. Disconnect the seat belts that come down from package shelf using a 17mm
socket.
4. Remove the holding pin fasteners from the plastic panel above the entrance to
the trunk and remove this panel (the pins pull out of the center of each
fastener using a pliar.)
5. Remove the lamp units in each C pillar panel by pulling from the top of the
lamp assembly. Disconnect the wiring and remove completely.
6. Remove each c pillar panel (the grey/tan panels) by pulling out above the
light hole and pull forward. You will notice small plastic tabs along the upper
edge that have to go back into the slots on the window frame when you reinstall.
7. Remove the head restraints by pulling straight up. You may need to pull the
chrome posts out separately.
8. Remove the rear vent louvers by pulling up on the inside front corner using a
small screwdriver. Be careful not to scratch the plastic. Pull them out toward
the front (note the tabs on the back are what fit into the brackets on the body
and that is what holds down the rear of the package shelf.
9. Lift the front of the package shelf and start to slide if forward. You have
to lift it and pull at the same time to allow it to clear some of the interior
items.
10. Pull the seat belts back through the openings in the shelf and then the
shelf can be removed. You should now see the speakers in their soundboxes.
Speaker Installation
1. Carefully pull the foam surround away from the speaker.
2. Using a small allen wrench, remove the (4) retaining screws - one at each
corner.
3. Remove the driver and disconnect the 2 wires.
4. Replace with the new speaker.
I ran new wiring for these speakers directly from the crossovers, bypassing
the factory wiring harness.
Rear Deck Installation
Basically do the removal steps in reverse order. The only tip I can give is to
be very sure the vent louver clips are in the slots in the body and are a tight
fit. If you plan on installing your amp(s) under the deck in the trunk, you will
want to run all of your wiring and mount the amp before putting the rear deck
back together. This will allow you to fish wires easily and test to make sure
the mounting screws do not poke through the deck cover.
They are crap... I am replacing all mines with RSB215's by MB
Quarts
http://shop.store.yahoo.com/007-caraudio/mbquarrsrefp1.html
This way it will at least improve the speakers, and if I need a better
improvement I can add an amplifier and patch into the existing wiring harness,
allowing me not to have to remove the door panels again.