Message Title: Re: Auxiliary cooling fan testing
Posted by: Dudley Doright on 2002-01-10 at 12:50:37
(posted from: Host: IP: 64.19.188.4)
Message:

The initial test - turn on the AC. Does the fan run? No? Then in all likelyhood the fan has gone deceased.

Why? The E39 likes to suck up leaves and crap into the fan. These build up behind the fan, clogging up the guts, and eventually it doesn't run. BTDT with my '98. New fan lists for $330, takes about an hour (if you have the right tools) to install.

To test the fan itself, you'll need a source of 12VDC (I use a motorcycle battery). The connector for it is on the upper left side of the housing. Disconnect it. You'll find a bunch of female pins on the connector going to the motor. I don't have the wiring diagram handy (I traced it out), but the BIG wire is ground. Put negative to that wire. Connect positive to any of the other pins. The fan should run. It should run at a different speed for each pin. It has 3 speeds, from VERY FAST to AWFULLY FAST to FAST.

If it runs on all three speeds - the motor and resistor packs are OK (the resistors are mounted on the fan housing). Your problem is either the temperature sensor OR the fan relay. The temperature sensor screws into the back of the radiator on the reservoir side. Has a green connector going to it (from memory). IF the fan motor ran in the test above, you can jumper pins on this connector to test the relay pack. I don't have the pinouts handy (but if you post your email address I'll contact you directly).

If the fan motor works, and jumping the wiring from the temperature sensor works - then it's the temperature sensor that's bad.

If the fan motor works, and jumping the wiring from the temperature sensor doesn't work - it's either the fan relay or the fan fuse that is bad. Dunno where the fan relay is, because I never bothered looking for it once I figured out my fan motor was bad.

If the fan motor is bad - you have three choices:

1. Throw $330 to the parts guy and buy the fan and install it yourself.

2. Throw even more money to the service department and have them install it (it isn't THAT hard a job.. I did it after dark in less than an hour, and that included cleaning all the crap off the front of the AC condensor that was behind the fan shroud.)

3. Take the old fan out and try to fix it. Then reinstall it. I did fix the old fan (it's in my loft in the garage as a spare now.. I did #1). Turn the fan over, use your air-compressor to blow as much of the crap out of the inside of the motor as you can. The motor is swaged together - meaning you can't take it apart. Then spray electrical contact cleaner into the cooling holes in the back while spinning the blade. Let it dry. Connect it to a 12V source and try spinning it by hand. Mine initially didn't do much, but after lots of hand spinning, the motor started to catch intermittently. I repeated the air-blasts and contact cleaner, and connected it again. It got better. I kept blasting it out, running it, and eventually started spritzing WD40 in the holes. After a few hours of this kind of playing around - it ran just fine - on all 3 speeds. It went back into the box the new one came in and got stored away as a spare.

If you are in NJ - you're welcome to borrow my spare while you fix your fan..

If you leave an email address here (The 5 Series (E39) Message Board) , I'll pass along a website link that has the wiring diagram of the fan motor on it (I traced it out).. which will help you in the initial troubleshooting.

Oh - how to prevent this happening with your new/fixed fan? I made up leaf guards from 1/4 mesh 'chicken-wire' (hardware cloth) that fit the two grilles in the hood, and the big bottom opening. Painted black they aren't really noticeable (and if you do notice the ones in the grilles they look cool mounted behind a chrome-slat grille). These have worked great - the bottom one has caught LOTS and LOTS of leaves this fall that would have been munched up by the fan and packed where you can't clean'm out. Sometime I gotta take some pics of these and put them up on the web. HIGHLY recommended modification.

Dudley Doright (Hold the horses Nell!)


From: Alan Kenny AKenneyD@msn.com

Subject: To remove Pusher Fan


Hi Folks, It was not hard at all, First I checked "search" at roadfly.org, E39 and found archives under auxiliary
fan & under pusher fan.

Tools needed was a 1/4" ratchet, 8mm,10mm,13mm sockets, 8inch extention came in handy, a 3/8" ratchet and a T-45 (torks) socket bit, needlenose pliers,and a small pick to drive out the plastic push-ins.

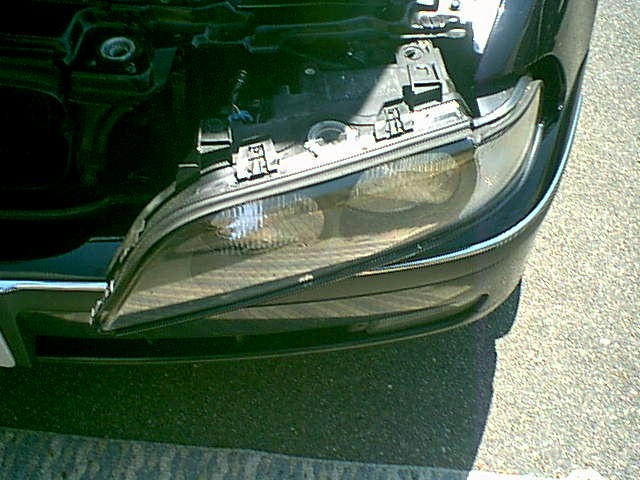
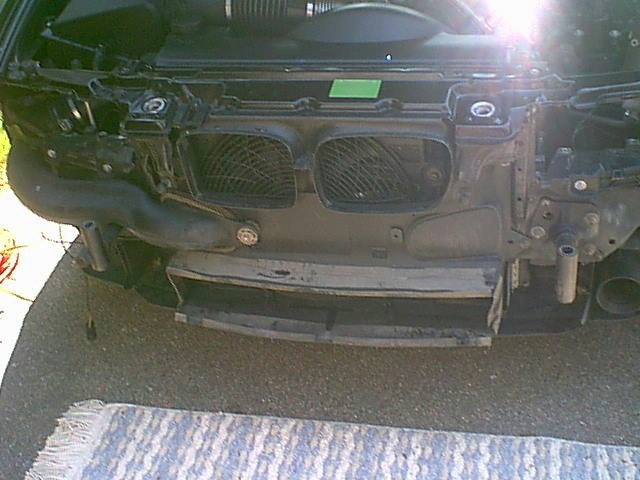
First I used a 8mm sockets to remove the two headlight assembly's, the ext. came in handy for the
back bottom two, disc. the wire plugs and pull them forward having the center edge come first. Then in
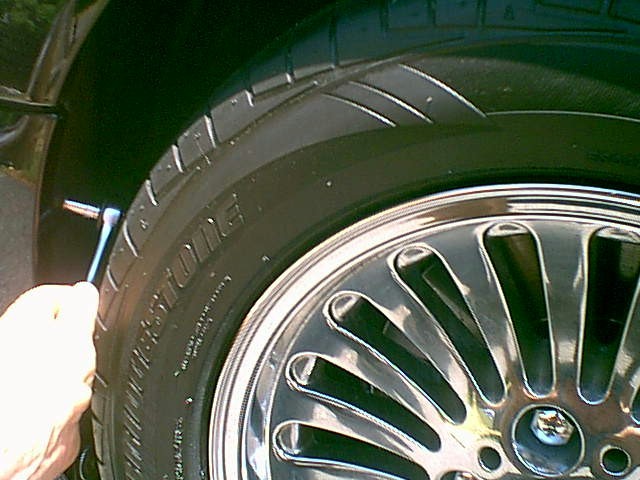
the wheel wells, I removed the bottom two and the outter upper one, 8mm screws towards the front. Then use the pick to pull down the center pins that are located in the front lower grills, next to the fog lamps (up
under top side), pull down the center pin and the plugs will come out, 
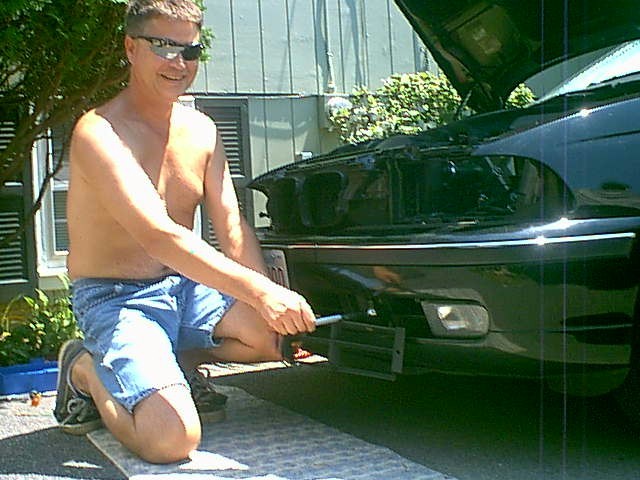
then pull out the little grills and you can see the spot up under where the T-45 bit goes to remove the bumber, I put a piece of carpet down 
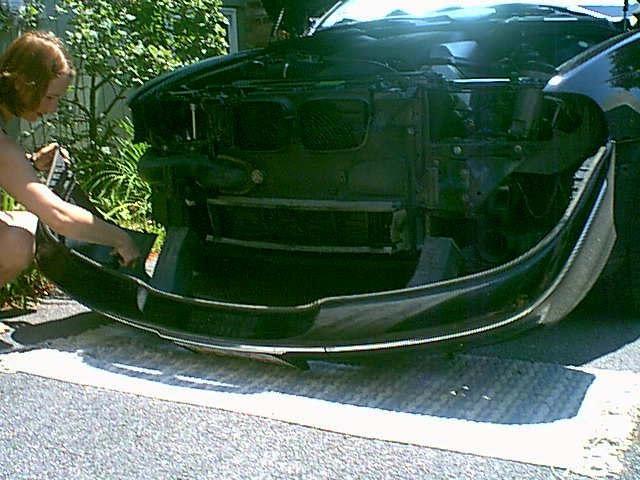
and it slid right out to unclip the fog light connectors, all the duct work slides out with the bumber assembly, now the rest is easy.

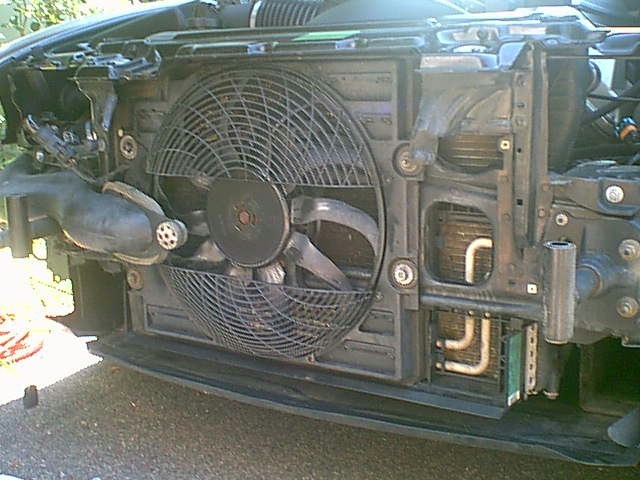
A 10mm socket to remove the air snorkel bolts, 13mm to loosen the fan frame assembly, and the three plastic push-ins that attach the shroud to the radiator frame I used the pick and pushed the small center pins, straight down and caught them at the bottom, the needlenose pliers came in handy to pull the lower left fan shroud push-in pins center out, and unplug the wire connector. My '98 540 Fan had 4 wires, tan (brown) was negative, black and a black with red stripe was low and (med.?) and the black with blue stripe was the high speed, which uses the two large wires. Next I Pull it off the car and cleaned out all the debris... alot of crud in mine, blocking good air flow and good fan operation.

I took the fan in and blew it out with air and spayed a little WD-40 in the holes in back and keeped playing with it with a 12 volt dc power supply / battery with the negetive on the tan and the positive on the Black with blue stripe....  slowly but surely it roared back to life...as Did "Dudley Doright's" who's archive gave me the Idea of trying this before spending the $360.00 US at my dealer!, just for the part!

I check the connector at the car and found 14 volts dc there across the tan and one of two smaller wires ( either the blk or the red striped one) with car running and the A/C on, so I figured that the relay and fuse was good, I then threw it back on, pluged in the wire connector and restarted the car up and turned on the A/C, with a little help at first, it started, and I let it run awhile to revive itself and I heard it go from low to high speed as the car heated up and back down to low again. I shut the car off and back on a few times and it was OK, I put it back together, COOL  A/C AGAIN!

It takes an hour to remove, an hour (I spent) cleaning out the fan, condencer and radiator and an hour to put it back together. As stated by others before me and I'll agree that it is a good Idea to clean out this fan and area even if yours is still running, as preventitve maintenance!!  Good Luck,  AL    103Control


Message Title: Re: Electric Auxillary Pusher Fan Update
Posted by: Jim Cash on 2002-07-08 at 12:50:33
(posted from: Host: hse-montreal-ppp141224.sympatico.ca IP: 64.228.205.151)

Message:

Dave

Just some further info.

Yes jumpering at that rad temp sensor connector will allow you th check the operation of the fan.

By jumpering at that point you are operating the relays that provide the power source to the fan. Relays are in the E box.
The low speed of the fan is obtained by passing the current through resisters located on the front of the fan housing. To get high speed the voltage is applied directly to the motor bypassing those resisters.
So failure to operate can be a relay, wiring, or resister problem as well as the fan motor.

There is another path to operate the low speed - input from the climate control unit to that relay circuit. But there is logic related to compressor opertion, compressor system pressure, and external temperature above 10C.

My info says that the high speed is activated "only" by the rad temp sensor going above 99C. So do not expect the A/C system to activate the high speed of this fan.

And - I think there have been about 6 versions of this fan and circuit. In 98 there was a change in May and again in Sept.
Sometime in 98 or 99 they changed from the 2 speed fan to a variable speed which as more smarts behind it's operation - so diagnosing operatin is more complex on those - I don't have those details.


Cheers
Jim Cash