
+

|
|
+ |
|
XM Radio Installation in 5-series
I've finally zeroed in on the whistling/whining noise that has plagued this installation since day one. Although the Sony receiver includes small magnets which you're instructed to thread both the DC power and antennas through, at higher than low volumes, during quieter segments of songs, there was a perceptible and annoying whine that increased in frequency in proportion with the engine speed. After some experimentation, I fixed the problem by ordering some flexible magnet sheeting from McMaster-Carr, an amazing supplier whose inventory makes Home Depot look like the corner hardware store.
Anyway, I bought 2 ft. of part number 5756K32 (which you can easily ring up by searching with that part number). Total cost, with tax (I live in GA) and shipping, was about $8. The material is relatively thin and highly pliable; Using a pair of scissors and some electrical tape, I cut two long strands and covered the exterior of the receiver cradle, covering nearly the entire black casing (ensuring to cut holes for the cradle circular base and the air vents on both sides). I then proceeded to cut long and thin (about 12" x 2") strands to (horizontally) wrap around as much of the power and antenna cables as I could (except the antenna portion that's exposed outside the car). I used small (4") plastic ties to secure the magnetic film every few inches or so. I suppose the polarity would be important, but I just curled the material along its natural tendency (it came rolled up).
A truer scientific study would have covered each of these three--power cable, receiver cradle, antenna cable--separately and tested the unit between each to see the result. But I just decided to go all out. Boy, was it worth it. Once done, I fired up the engine and cranked up one of the news stations (which has lots of talk and silent pauses), as I headed down the street for a test. I accelerated hard several times, nearly redlining the engine, and was pleased to hear not a trace of that dreaded noise. Just the music of the engine singing at full wail. Awesome.
I've received reports that, while Phatnoise still won't directly sell the BlitzSafe adapter to people who haven't also bought the Phatnoise MP3 system, it is possible to buy the unit directly from Blitzsafe (201-569-5000) if you get a cooperative representative on the phone.
Update -- 7/28/02
According to BMWNation.com, 2003-model 5-series cars will feature "pre-wiring for auxiliary input standard on all radio systems." Presumably, this will allow easier integration with the planned Sirius satellite radio option, but I still haven't seen any specific news on that front. Assuming this is an RCA stereo connection jack, integration with after-market audio systems (including XM tuners) should be far easier, allowing you to bypass a special adapter (like the Blitzsafe one I use) and a digital-to-analog converter.
Update -- 5/3/02
I've made some aesthetic improvements to the installation and have updated the pictures below to reflect the changes. I've also included a review at the bottom, as well as cleaned up some of the installation notes.
Introduction
This page describes the process I went through (well, the abridged version without all the dead-ends and frustrations) to install the Sony XM plug-and-play radio (model DRN-XM01H) in my '02 530i (with DSP).As of this writing--1/28/02 (still valid as of 5/3/02)--the only other after-market XM satellite radio tuner I know of--aside from complete head-unit replacements--is the Pioneer unit (model GEX-FM903XM). I chose the Sony for a couple reasons:
My goal was to wire the radio directly through the car's DSP amplifier in the trunk for the cleanest audio integration. The alternatives were as follows:
Components
Following are the items purchased, as well as model number, source, and approximate cost:
Sony XM plug-and-play radio (DRN-XM01H, Circuit City, $285 on sale), includes antenna, power cord, cradle, mount, and cassette adapter (not used)
PhatNoise Blitzsafe Adapter for BMW (BSABMW, http://store.yahoo.com/phatnoise/bmw.html, $60). See 9/15 update above.
Digital Series analog/digital converter (15-1242, Radio Shack, $50)
6v/9v 500mA cigarette lighter DC-to-DC power adapter (273-1805, Radio Shack, $9)
Two (2) Dash-Mount DC Accessory Outlet (allows splicing into existing power lines) (27-1556, Radio Shack, $6)
Monster Cable Interlink 100 4-meter RCA audio interconnect cable (149465, Best Buy, $15?)
Acoustic Research y-adapter miniplug->RCA stereo cable (AP042, Best Buy, $8?)
Jensen Road Gear female-female RCA interconnects (RG301, Best Buy, $2)
Right-angle stereo miniplug adapter (274-372, Radio Shack, $3)
Power adapter (2 prong->DC plug) between the 9v power adapter and the analog/digital converter (273-1724?-verify fit, Radio Shack, $1?)
Existing digital coax cable (RCA); shouldn't be more than $5-10 in an electronics store
SMB right-angle plug (A4033-ND, http://www.digi-key.com, $4)
Velcro fasteners (assorted, Home Depot, $3)
New: Sony XM home accessory kit (DRN-XM01HK, Crutchfield, $149.95) for listening to the unit at home.
New: Dispensable metal coat hanger
New: Faux black leather ('leatherette') fabric swath from fabric store (quarter yard, about $8)
Tools for Installation
Screwdrivers, #6-32 bolts/washers/nuts
Adjustable wrench and/or socket set
Assorted screwdrivers
Soldering iron and solder
Wire stripper and crimp tool(s)
Power drill, scratch awl (for pilot holes)
GE Silicone II sealant (window & glass outdoor, black)
Masking tape
Installation
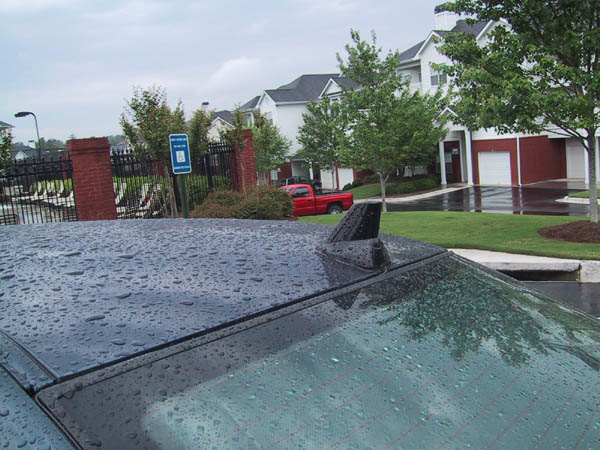
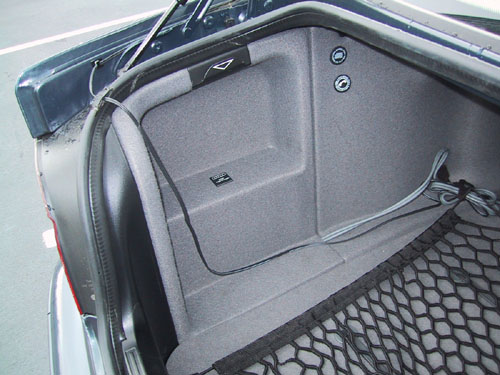
I first installed the antenna. Its base is magnetic, but since the roof of the 5-series (towards the back where installation is recommended) is convex and the antenna base is straight, it only forms a tangential contact patch. I therefore (carefully) applied silicone around the antenna base, using liberally-applied masking tape on both the roof and the antenna to keep it clean (I wiped down the excess with a paper towel before peeling back the tape). (Warning: I'm unsure about the long-term effects of the silicone on the paint, and removing it once it's completely dry is a difficult process). I ran the antenna cables neatly within the groove between the rear windshield and the roof/C-pillar, and down into the trunk. Here's what it looks like:
Next, the wiring to/from the cabin. I had to run the antenna cabling (actually two strands: one is for the satellite, the other for ground-based "terrestrial" repeaters) from the trunk to the cabin, and run the RCA cables from the (XM receiver in the console of the) cabin to the the trunk. Since I don't have the rear fold-down seat (not sure how they're assembled differently), some surgery was required. Following the good directions (steps one through four) at http://www.nextmill.net/bmw540/rears.htm, I removed the rear seat bench and utilized the hole (about an inch across) directly behind the armrest. It's capped with a plug you can push back towards the trunk, which is easily enough to run the wires back and forth. I then reassembled the seat, leaving the cables protruding from underneath the seat center along the middle bulge. Here's what it looked like, after I fastened the cables up:
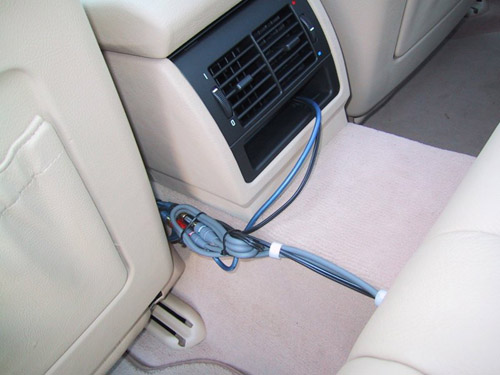
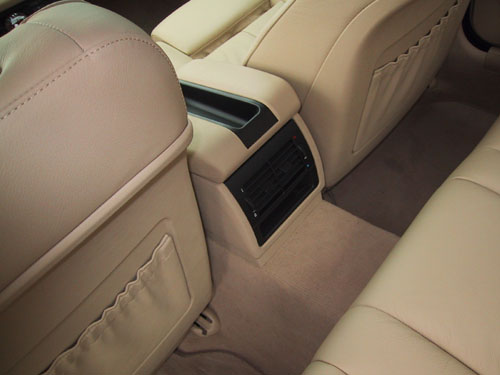
5/3/02 update: After getting some helpful advice from (name forgotten, I'm sorry), I realized it was possible to lift the carpeting enough to run all the cables completely underneath. The carpet isn't glued or fastened down around the center hump in any way, but it's extremely difficult to lift it much more than an inch or two. With the rear bench removed and a wrench holding up as much of the carpet as possible, I loosened the center console and held it up using string. That allowed me to slide the wiring down around the rear vents and the tray pictured above, and underneath the carpet straight back to the rear bench. This was a PITA but certainly worth the effort:
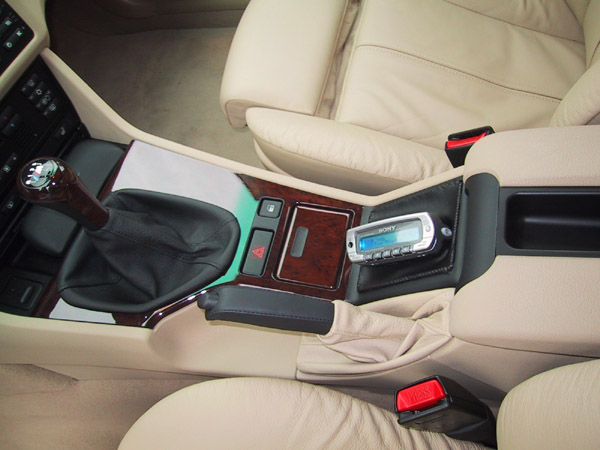
Next, I installed the radio. I
decided to place it in the small tray forward of the armrest, mainly because I
couldn't find anywhere better. Following the instructions at http://members.roadfly.com/Agent99/armrest.htm,
I removed the center armrest, and continued with the directions at http://members.roadfly.com/radarguyCT/remove_center_console.htm
to open up the center console. The small tray and door unit pops right
out. At this point I drilled four holes into the left side to mount the
cradle base for the receiver (it
has five holes, but three are inaccessible for mounting here because the console
piece doesn't reach down low enough to cover them). The mount is already
slotted, so I just drilled a couple of holes on the second slots down each side
(sorry, I don't have a picture, but it should be fairly obvious if you're
looking at it). I then found a good place for the unit to sit,
and (carefully using a plastic bag to catch the drilled-out plastic) drilled holes into the side of the console plastic facing the driver's seat,
and fastened the mount down with an extra washer between it and the console
(necessary for the room and angle of the receiver to fit properly). I used
the right-angle stereo plug immediately behind the receiver (and connected it to
the y-adapter miniplug/RCA stereo cable). The audio wires and antenna
cables go straight back (see above) . Next, I installed
one of the DC accessory outlets, tapping into the red & black cable that
runs up to the cigarette lighter and grounded to one of the screws under the
console. This powers the XM radio. I screwed the radio's cradle in
before reinstalling the console, since the angle was difficult to
thread the cradle on the base mount after the console was in place and the
cables were all attached to the back of the unit. Once completed, it looks like
this:
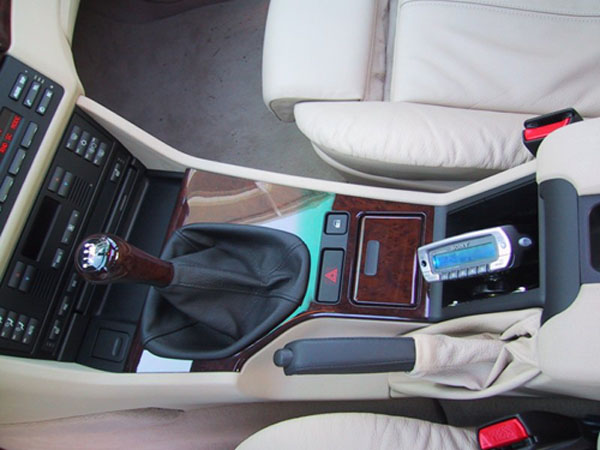
5/3/02 update: Using a sacrificed coat hanger, I shaped a rectangular frame (no need for welding). Holding a large enough piece of the faux leather around the receiver, I carefully cut out a hole to fit around the unit snugly. I then measured off the size of the hole around the unit, and cut about a half inch longer than each side around the perimeter. I then put my home-economics skills to practice and sewed the fabric around the metal frame, and finally placed the unit down. It's not as professional looking as the gearshift boot, but it's about ten times better than the hole above (more dramatic a difference than the pictures illustrate). It doesn't snap into place, but sits there securely and doesn't budge:
Finally, the wiring job in the
back. This picture basically sums it up:
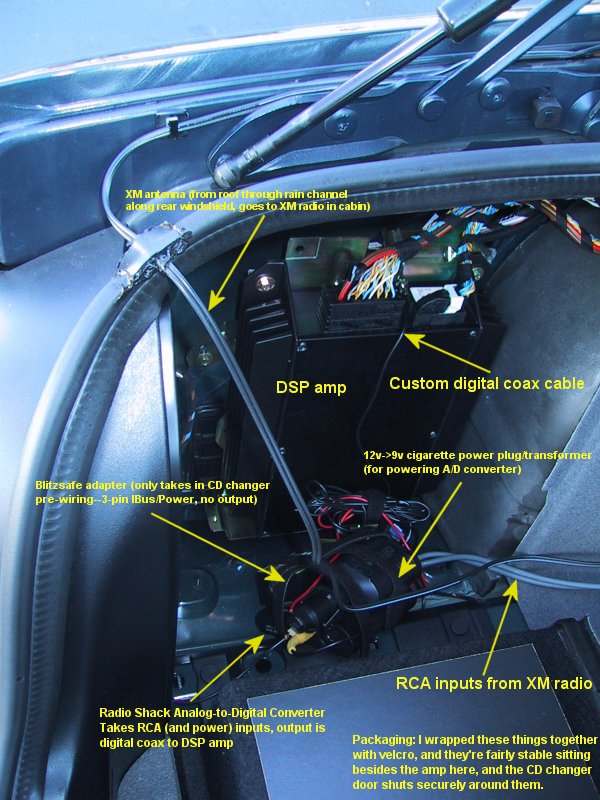
With CD door shut:
Unfortunately, the Blitzsafe adapter is required because that's the only way the head-unit recognizes a CD changer in back. When tuned to it (DSP modes are compatible), it's fooled into thinking it's controlling a CD changer, but of course the signal going into the amp is coming from the XM radio. (For those without DSP, you can simply buy the BMWPILA adapter from http://www.peripheralelectronics.com (available from Crutchfield for $100), which takes in RCA inputs, and ignore the A/D converter and Blitzsafe adapter in the picture above.)
Electronics/Connections
The connections in the rear are largely similar to those found in http://www.dailyphat.com/install/PN_Tech_Doc_3--BMW_DSP_Information.pdf (except there's no PhatBox player--the adapter is a dead-end, and the A/D converter gets the signal from the XM radio). As for the custom coax cable connection in the picture above (required since the DSP amp takes in not a standard RCA plug but a proprietary SMB plug): The directions for assembling this can be found at http://catalog.tycoelectronics.com/TE/docs/pdf/8/72/185278.pdf. If you don't own a soldering iron and/or don't want to mess with this, you can just buy the "DSP Kit" from http://www.PhatNoise.com, which includes the Radio Shack A/D converter, this special cable, along with velcro strips, an extraneous (only 3 ft) RCA cable, and a power cable unnecessary for this installation.
The connections up front are fairly straightforward as well. If I get enough questions about this, I'll put together some wiring diagram.
Review
I've enjoyed XM radio now for three months, and I still love it. I barely use the car's CD player anymore, let alone the standard radio. XM programming is excellent: varied, deep, and creative. With so many channels, the metaphor with standard versus cable TV is very appropriate. The sound clarity is extremely good (audibly as good as the CD player), and reception is generally very strong (fading intermittently only in long tunnels and when sometimes when between tall buildings, but XM continues to place ground-based repeaters in cities to minimize this). And now that I have the home unit as well, I easily swap the unit between the car and my living room without having to pay twice the subscription fee for two units.
Downsides: With the recent whine fix, there are truly no disappointments I have with the system whatsoever. XM rocks.
Last words