Replacing
your Rear Window Regulator
Caveat
lector
Ok,
kids, that trunk lock actuator job was pretty easy but this one requires some
manual dexterity. Please read this entire document before setting forth on your
rear window regulator fixing journey. The hardest part was screwing in the top
bolt of the regulator after having had replaced it with the new one. The second
hardest part was putting the door cover back on. There are a few things you
need to make sure of and I've underlined these below. Otherwise, the rest of
the repair is smoove sailing.
I would HIGHLY recommend letting a professional do this repair if you have the
rear airbags. I don't have rear airbags in my car and would not feel confident
that it would not deploy upon the slightest fidgeting. Airbag deployment would
likely cause injuries or death and would most certainly ruin my weekend. If
you don't have rear airbags, then proceed at your own risk. Don't force anything.
If it requires force, you're probably doing it wrong. Righty: Tighty, Lefty:
Loosey. Doing this or any repair yourself may void the warranty. YMMV.
Symptoms:
For me, it was the window rolling down but not wanting to roll back up. It
seemed as if it was caught on something. The window motor seemed to be working
fine, however.
Time needed: Variable but about 1.5-2.5 hours
Maximum.
Skill Level: Medium
Parts needed:
Left
or Right Rear Window Regulator
|
$107
at Pacific BMW
|
10mm
Cresent wrench
|
trunk
toolkit
|
T20
Torx driver
|
Pep
Boys, Sears, ???
|
T25
Torx driver
|
|
Small
slot screwdriver used for prying, cover with electrical tape so as not to
scratch anything.
|
Pep
Boys, Sears, Radio Shaft (Everyone and his dog has probably owns a set
already)
|
Philips
screwdriver
|
trunk
toolkit
|
Extra
white door clips (in case you break any)
|
<50
cents a piece at Pacific BMW. Get a few.
|
Something
flat but rigid for step number 4
|
I
used a plastic ice scraper covered by a tubesock.
|
Removing Rear Door Panel
1)
Using a small flat screwdriver, pop open the screw cover. Remove the
Philips screw underneath.
2) Remove the under-door light by prying
it down from the edge closest to the front of the car and then removing
the wiring harness.
3) Remove the window switch. Using a small
screw driver, just pry it upwards. Remove from wiring harness.
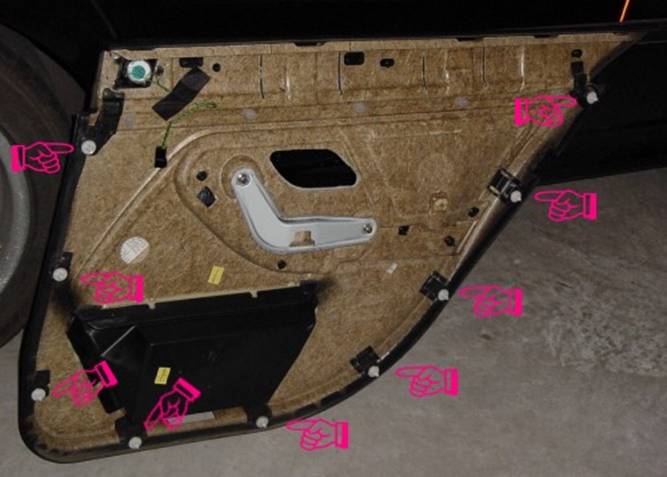
4)
Pry the door cover off the door itself. The door cover is attached using 9
white door clips and one black square-ish plastic piece. To remove the
white clips, I covered an ice scraper with a thick tube sock so it
wouldn't scratch the door paint. You might be able to find more elaborate
implements to use as a wedge but this worked fine for me. Each white door
clip takes about 5 lbs of force to pop loose. Just use a gentle but firm
pull. Please note that the bottom 2 clips are mounted on the black
plastic of the storage bin. Watch where you pry.
5) After the door clips are off,
pull, turn and push the door handle assembly through to the inside. Pull
the door cover up and out. (5-8 lbs of force to remove.) Again, be gentle
but firm and wiggle it a little. (I'm talking about the door cover. 8) ) Don't
pull the door cover away too far - there is the speaker wiring harness
that you still need to disconnect.
|
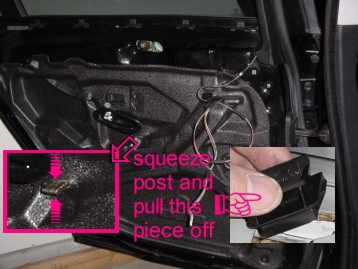
6)
See that black plastic piece that is on the post? Remove that by squeezing
the pliers on the post and sliding it off.
7) Pull off that sound
proofing foam away from the door. It is attached only by this really tacky
black adhesive.
|
|
Replacing Window Regulator Assembly
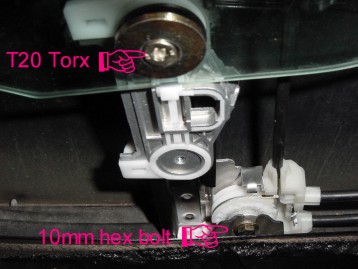
8)
Roll down the window about 80% down. Using a torx T20 driver, unscrew this
torx/washer combination.
9) Manually, pull the window up to the
very top/fully closed position. It should stay put there. You can also ask
someone to hold it to make sure it stays in this fully closed position or
alternatively you can use some tape.
10) Remove the bottom bolt
also using the 10mm crescent wrench.
|
|
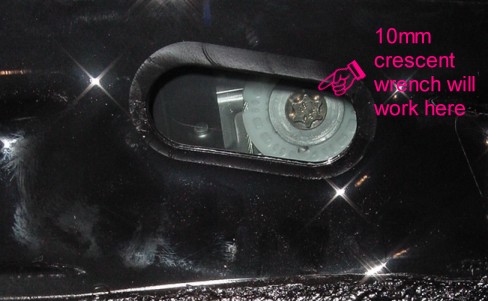
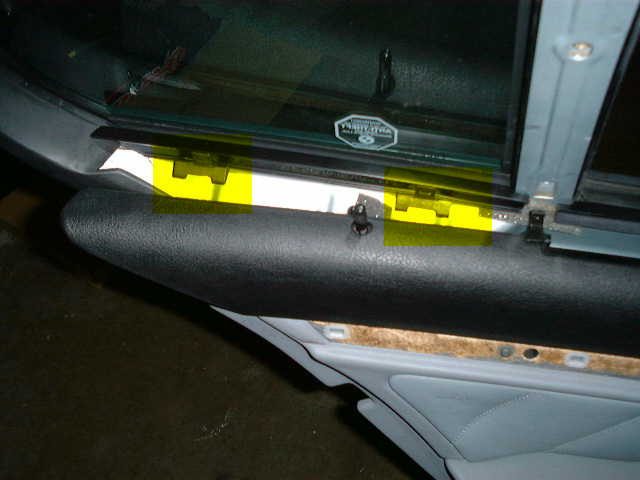
11)
Ok, see this top starburst shaped bolt in the picture below? It's behind
that soft plastic window. No, you don't get to it that way. It's also
behind the glass window. If it weren't you could use a straight hex bolt
driver but life isn't that easy. Get your 10mm crescent wrench, and stick
your hand under the sheet metal and reach behind the window glass and
remove the bolt.
|
12)
Pull off the wiring harness of the window motor assembly. Using a Torx T25
remove the four torx screws from the motor assembly. These screws are
pointed to at the right.
13) Pull the regulator assembly up and
pull the bottom towards the front of the car. Now you can slide it out.
14)
Replace with the new window regulator assembly. Slide the assembly's
bottom bolt into its cradle. Now here's the really hard part:
Screwing back the top bolt requires a bit of manual dexerity. I spent what
seemed like a good 15-20 minutes just trying to screw this top bolt back.
See the project notes below for more details.
15) Tighten the
bottom bolt.
16) Screw the window motor assembly back to the door.
|
|
17)
Pull the window down to the shuttle part and put the torx screw/washer
back on. Set it back into position and screw the T20 torx/washer assembly
back on. Don't overtighten it to the point where the glass cracks!
18)
Plug the window switch back into the harness and make sure the window goes
up and down (Oh yeah, if it doesn't, make sure the key is in the second
position, the child window locks are not engaged. If the window is not
moving freely, then unbolt the torx screw/washer and make sure the window
glass is on the right track and hasn't rotated. Don't force anything if
there is resistance or if the window is not on the right track or else you
might break the window.) Otherwise, If it's working
correctly/smoothly, then you're good to go.
|
Reattaching the Door Cover
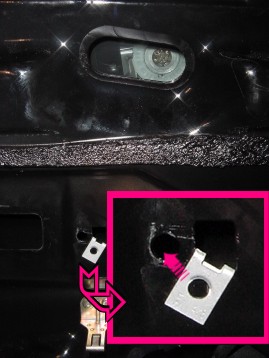
19)
Ok, make sure this little piece of metal for the door handle assembly
screw is over the larger hole. See the picture to the right.
20)
Pull the 3 sets of wires through the slit. For the foam insulator, the
factory adhesive stays tacky so it's doubtful you need more adhesive.
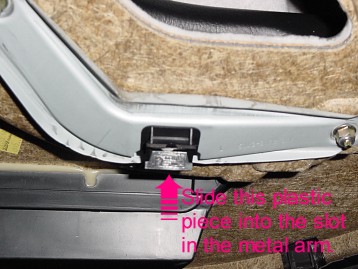
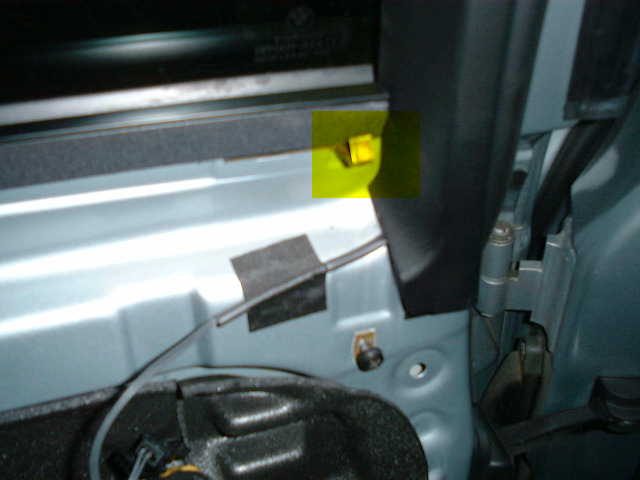
21)
Slide this little piece of plastic back on. I'd actually lube it up so
it's not so squeaky. See the picture below.
|
|
22)
Re-attach the speaker wiring harness and pull the 2 remaining wiring
harnesses through their respective door cover holes so you can access them
after you reattach the door cover. (Easier done than said! ;^ ) These
include the harnesses for the under door light and the window switch.)
Also pull the door handle assembly through the door cover before snapping
the door cover back on.
23) For the door cover, snap in the top
part of cover along the window sill. This requires some work and playing
with. Once you have that secure and looking good, move on to...
23)
Push the center of the door cover where that small black plastic piece is
into the post. Once you hear that click, then snap in the remaining 9
white door clips. In case the black plastic piece from Step 21 falls out,
you will need to feel your way into putting it back into position.
24)
Secure the Door handle assembly using the Philips screw and replace the
cover. And finally reattach the wiring harnesses for the window switch and
the under the door light. Re-mount the switch and the light. That's it!
|
Project Notes:
1)
That damn Top Bolt! I kept trying to screw it back in but it kept falling
out. Finally, I just stuck my hand under there and turned the bolt the
first few revolutions using only my fingers. Then finish it off using the
crescent wrench. But it requires girlie arms so you EEs and programmers
will have no problem. ***Time for me to hit the gym.***
2) Remember
that door handle screw hole clip in Step 19? Well, after I placed the foam
and the door cover back on, it dropped to the bottom of the door. I wasn't
about to take the door cover off again, so I went to order it at the
dealership. It was a special order piece and will cost me $1. I also had
to cut a small hole so I could reattach it. Will post picture once I get
the part in.
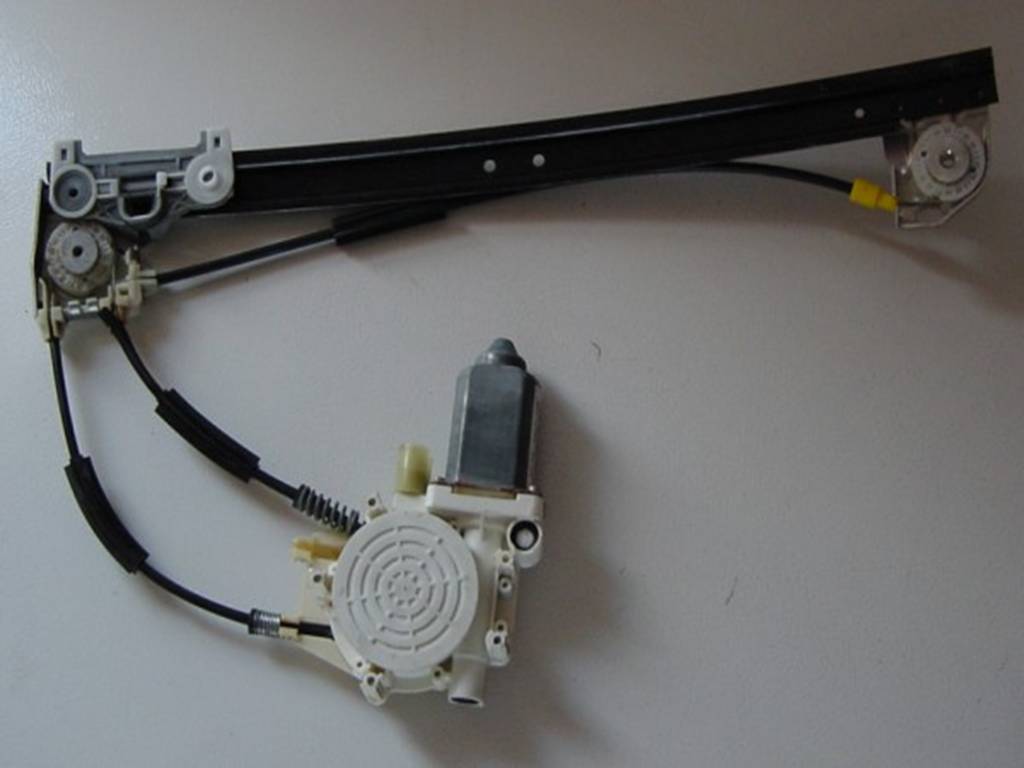
3) Below is a picture of my old window regulator. The
cables are rusted and have fallen out of their guides.
|
Updates
The only thing
differnet for me was that where the tip speced a Torx20 I need a Torx30
on a 1999
528
Dan
March 2003
- by VLM
a. Step 1
should refer to the door handle.
b. Extra steps
in between step 4 and 5 to remove door panel with factory shades. The steps
are
i. Remove blind on side window by unhooking the blind at top (insert a small
screw driver on
side hole to lift hook) and pull blind forward. See hook at top of window in
picture below.
ii. Remove the
wood trim by prying it out with bare hands. Be careful to pull gently to ensure
that you don't
break it.
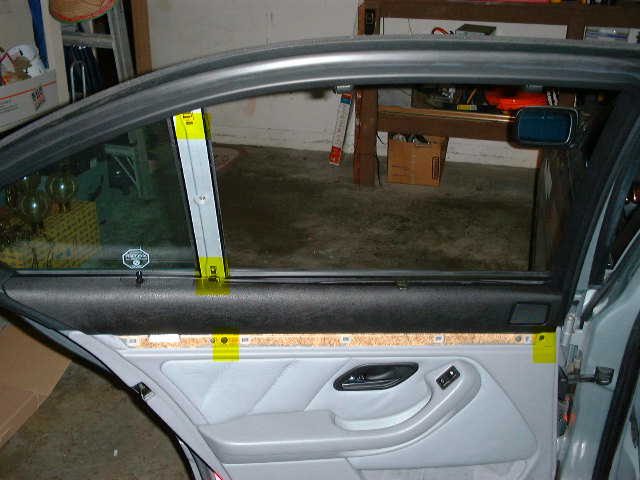
iii. You should
see window exposed as in picture above. Now remove the three screws that secure
the panel
to the sheetmetal. One just above the door panel and the two through the holes
in panel where the wood
trim was. Note to remove the two screws through the holes and not the ones exposed
because those
hold the main roller blind to the door panel.
Now you can follow
step 5 to remove the door panel. The above two pictures show the three clips
that
hold the top part of door panel in place. So you must lift the panel up to free
it from the door.
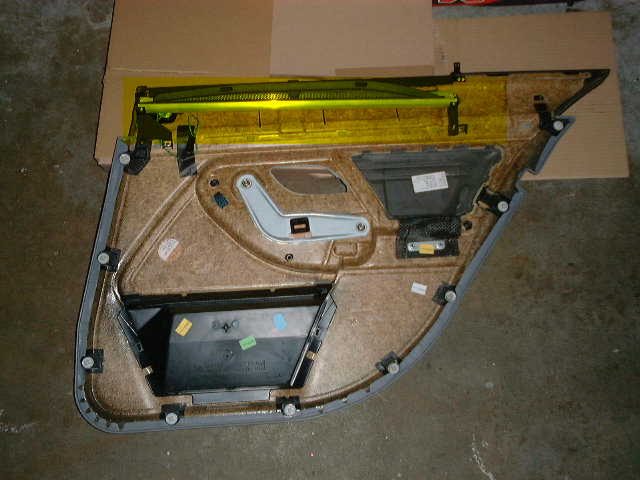
This picture above
shows how the roller blind is secured to the door panel.
Note on how to
secure the top bolt.
Use a piece of scotch tape to tape the bolt into place and install the regulator
per step 14.
Slide the top portion of the arm until you hear the bolt pop in place then use
a small screwdriver to turn the
screw several turns. I was able to secure the top bolt in under 5 minutes with
no frustration.
I also used a Torx30
in step 8.
June 2003 -
Jae Lee
After replacing
your window regulators, your Auto Lowering/Raising functions for your window
might not work.
Here is the reprogramming procedures.
Activating Automatic Lowering Function:
1. Turn Key to 1
2. Lower your window fully (manually)
3. Hold on to it for 30 seconds.
4. Done
Activating Automatic Raising Functions:
1. Turn Key to 1
2. Raise your window fully (manually)
3. Hold on to it for 30 seconds.
4. Done
Hope this helps~
Jae Lee