Source: http://forced5.home.attbi.com/diy/msport-wheel/index.html
BMW E39 M-Sport Steering Wheel
Retro-Fit
Prepared by VietSB
Contributions by Bob B and KrispyCreme
Modified 10.31.02
NOTE: Perform these steps at your own risk. All P/Ns listed are
a "best guess", so please double-check with your local dealer. These mods and
repairs were performed on my US-Spec 1997 540iA (11/96 prod date, M62 engine)
but there is no guarantee they will work on other E39s. These instructions are
provided for entertainment purposes only!
BACKGROUND: My original 4-spoke Multi-Function (MF) steering wheel was in excellent
condition, but my desire for a better-padded and slightly smaller diameter wheel
got the better of me...and my pocketbook. I looked into the Victor replacement wheel, which reuses the existing MF airbag
and button pods, but at $1K+ for the wheel only, I decided to stick with the OEM
M-Sport 3-spoke wheel. My research has resulted in a fairly accurate list of P/Ns
based on production year. Consult a knowledgeable dealer parts counter prior to
purchase since most won't allow returns on airbags, and will charge restocking
fees on steering wheels. Due to the high amount of confusion involved, some dealers
such as Pacific BMW no longer sell these components to consumers (at least via
mail-order). Since the steering wheel and airbag are critical safety components,
I can't stress enough that all readers heed my NOTE above and consider having a dealer perform
the installation.
There is one more drawback besides the price and hurdles above - you will lose
the handy-dandy air recirculation button currently on the MF wheel. :p
I didn't research heated steering wheel options and P/Ns since I don't have
a heated steering wheel. Due to my lack of first-hand experience with every
part listed below, check this site before ordering as other owners will be adding
their comments and updating incorrect info.
I have almost no install experience with 03/99+ wheels, so I'll highlight possible
alternate instructions in blue.
Required Parts:
[09/96-09/97]
- P/N 32 34 2 228 232 M-Sport Wheel w/o phone buttons [09/96-09/97] (~$345)
- P/N 32 34 2 228 234 M-Sport Wheel w/ phone buttons [09/96-09/97]
- P/N 32 34 2 229 130 M-Sport Airbag single-stage [09/96-03/99] (~$475)
Notes:
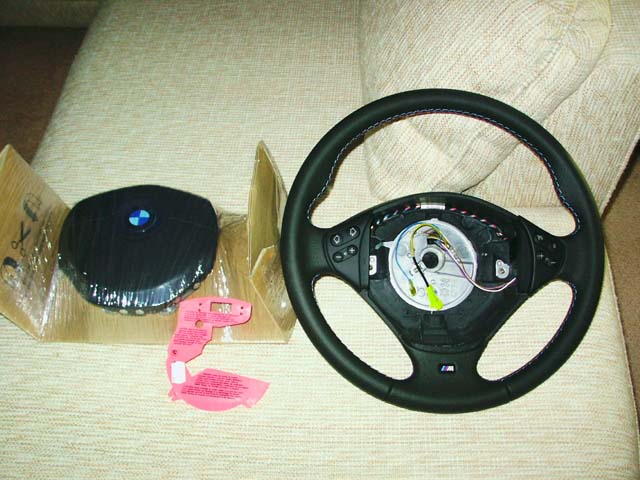
- Installed this on my 11/96 (prod date) E39. One dealer told me it wasn't
a US-spec or stocked item and must come from Germany, so the order took
an extra couple of weeks.
- M-Sport Tri-color stitching.
- Listed as 385mm diameter, which is slightly smaller than the MF wheel
~393mm.
- The 09/97-03/99 steering wheel P/N was stamped into the hub, so I have
no clue what the difference really is. Bob B has some info I'll post later
about possible leather differences.
- Bob B installed an M-Sport wheel (maybe this one) on his 08/96 prod
date E39. He ran into an issue where the button pods light up, but don't
function. Pre-09/96 E39s had a different button communication system that's
he troubleshooting now.
[09/97-03/99]
- P/N 32 34 2 228 670 M-Sport Wheel w/o phone buttons [09/97-03/99] (~$345)
- P/N 32 34 2 228 671 M-Sport Wheel w/ phone buttons [09/97-03/99]
- P/N 32 34 2 229 130 M-Sport Airbag single-stage [09/96-03/99] (~$475)
Notes:
- Appears exactly the same as the earlier wheel specs, so we're researching
what differences (if any) there might be.
[03/99-09/99]
- P/N 32 34 2 228 890 M-Sport Wheel w/o phone buttons [03/99-09/99]
- P/N 32 34 2 228 891 M-Sport Wheel w/ phone buttons [03/99-09/99]
- P/N 32 34 2 228 970 M-Sport Airbag dual-stage [03/99+]
Notes:
- BMW went to a dual-stage deployment airbag which is incompatible with
pre-3/99 cars. There is a corresponding steering wheel change with a different
hub, slip-ring design, and wiring (read more below). Otherwise, same general
specs as the previous wheels.
[09/99+]
- P/N 32 34 2 229 102 M-Sport Wheel w/o phone buttons [09/99+]
- P/N 32 34 2 229 103 M-Sport Wheel w/ phone buttons [09/99+]
- P/N 32 34 2 228 970 M-Sport Airbag dual-stage [03/99+]
Notes:
- I believe this is when BMW switched to an even smaller 379mm wheel with
improved padding. Very nice IMHO. I informally measured it to be about
12mm smaller than the previous M-Sport wheel.
- The all-black stitching appears to have started around this model.
- Since it uses the same airbag, it might be a good upgrade for folks
with the 385mm 03/99-09/99 M-Sport wheel.
[09/00+]
- 2001+ M5 Wheel and Airbag
Notes:
- KrispyCreme installed the round-airbag 2001 M5 wheel on his ??/01 E39
and noted the dealer told him pre-2001 E39's cannot be fitted with this
setup due to differences in the SRS control unit (see original post). FWIW, the 2001 M5 wheel and airbag show a fitment
date of 09/00+, so these owners might have an option of upgrading to the
very nice wheel shown on KrispyCreme's photo link. Possibly the earlier dual-stage SRS controller
was programmed for the MF and M-Sport airbags, but not the M5 version?
Anyone interested in this should contact a dealer for detailed information.
Required Tools:
- Flat-head screwdriver
- Phillips-head screwdriver
- 1/4" Ratchet, extension, T-30 Torx bit
- 1/2" Torque wrench, extension, 17mm socket
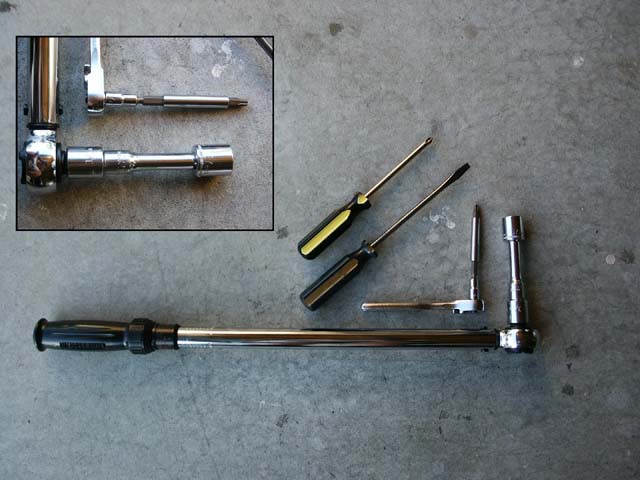
Recommended Tools:
- Smaller torque wrench to handle 2-8Nm
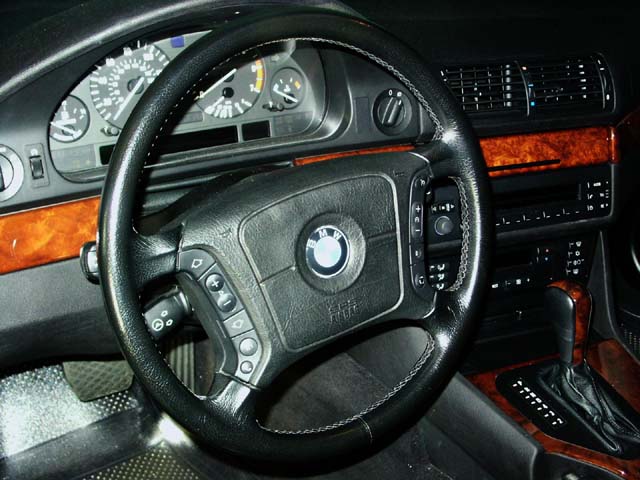
1. Take one last look and feel...
Turn the steering wheel to the center, straight-wheels position. Extend the
steering column outwards and driver's seat back for ease of access.
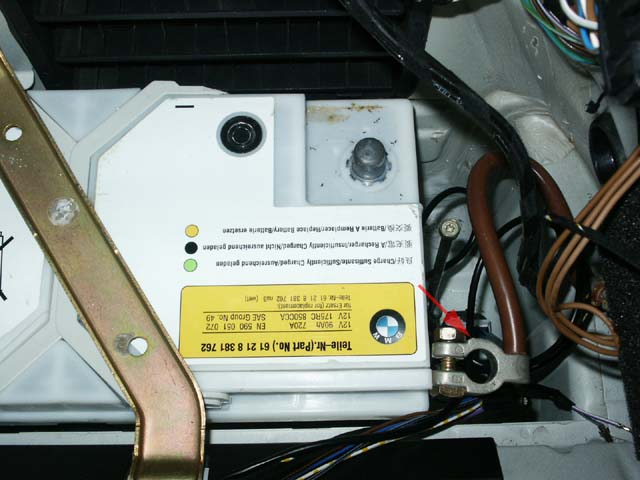
2. Be absolutely sure the battery is disconnected.
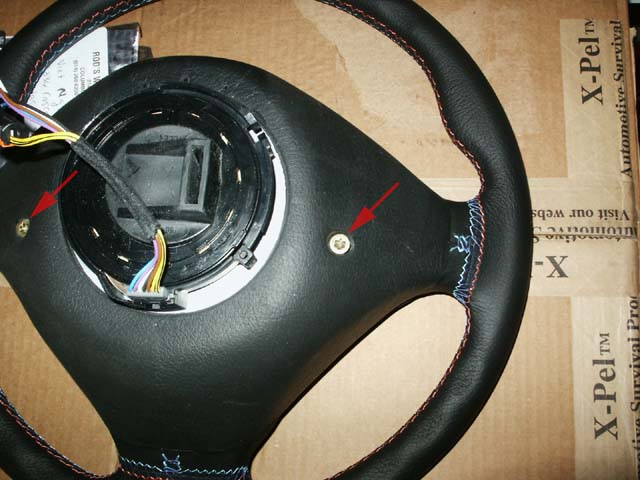
3. Loosen the (2) T-30 Torx bolts until the airbag is free. The 2nd pic is inaccurate
since the wheel is not in the center position. Things might need to be adjusted
like this to facilitate loosening of the bolts.
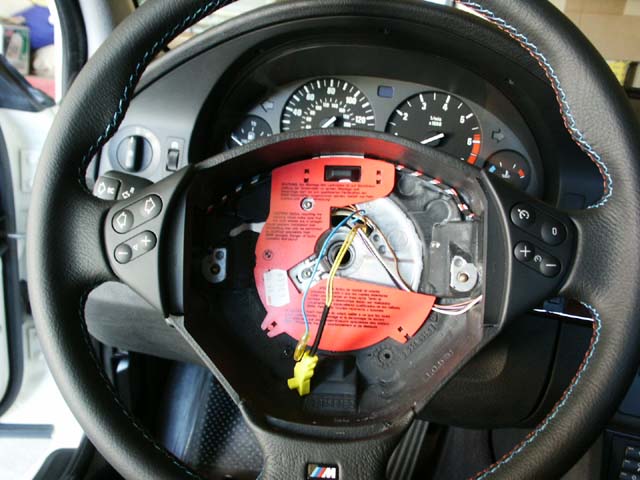
4. While supporting the airbag, unplug the horn line, button pod connector (top
red arrows), and airbag connector (bottom red arrow) to free the airbag completely.
Be sure to pull the airbag connector straight out to avoid breakage. Always handle
the airbag very carefully and store it with the face (BMW emblem) pointing upwards
and nothing lying on top of it. In the event of an accidental deployment, you
don't want it flying to the ceiling or launching a screwdriver at you.
03/99+ airbags have a wires leading from the airbag and button
pods to connectors in the hub-area. Simply unplug these connectors and remove
the airbag. Removing an M-Sport airbag is slightly different since the button
pods are integrated into the steering wheel and not the airbag.
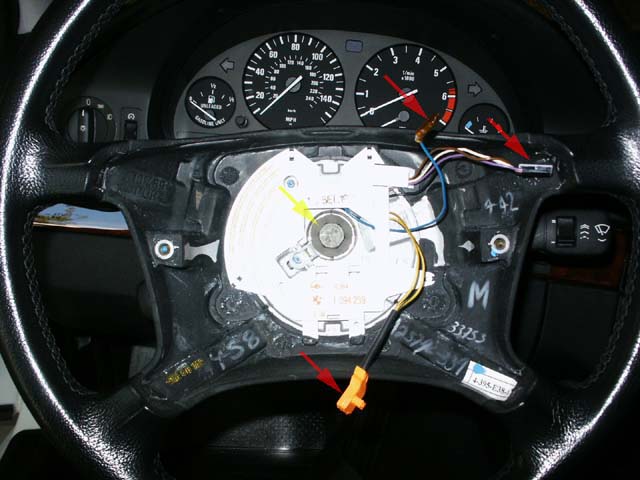
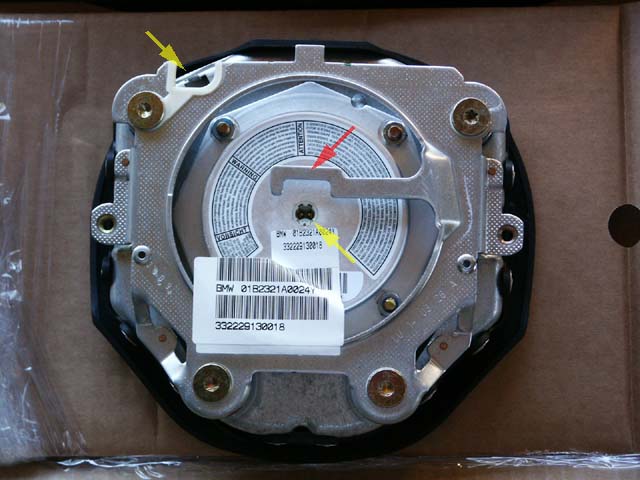
5. Remove the 17mm center bolt (see yellow arrow). KrispyCreme required an air-powered
wrench for this step, but most early-model owners found it loosened easily with
a breaker bar.
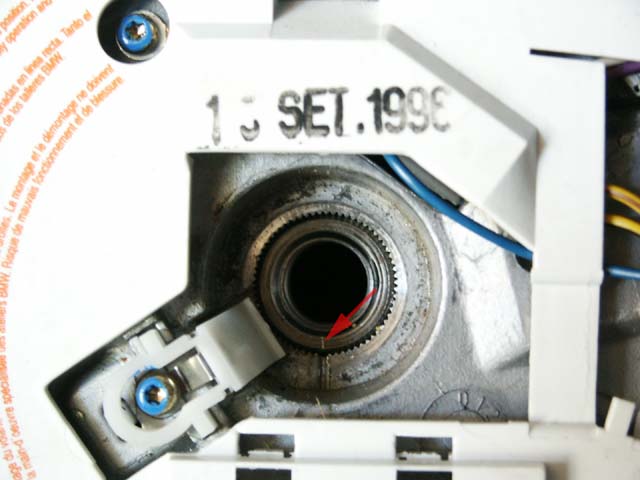
6. My car had an engraving on the steering shaft that lined up perfectly with
an engraving in the steering wheel hub (see arrow). If yours doesn't have this,
mark the shaft to ensure the new wheel is aligned properly before removing the
wheel. Note the white plastic latch at the 7:30 position in this picture. This
keeps the slip-ring from turning when the wheel is removed.
03/99+ wheels don't have the slip-ring attached to the back of the
wheel and therefore don't have the white latch.
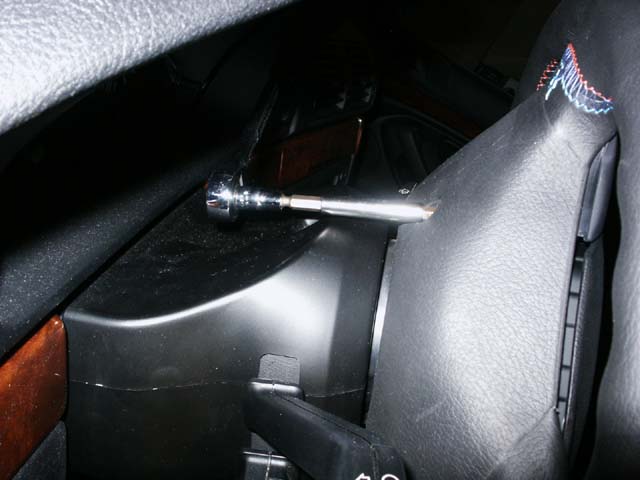
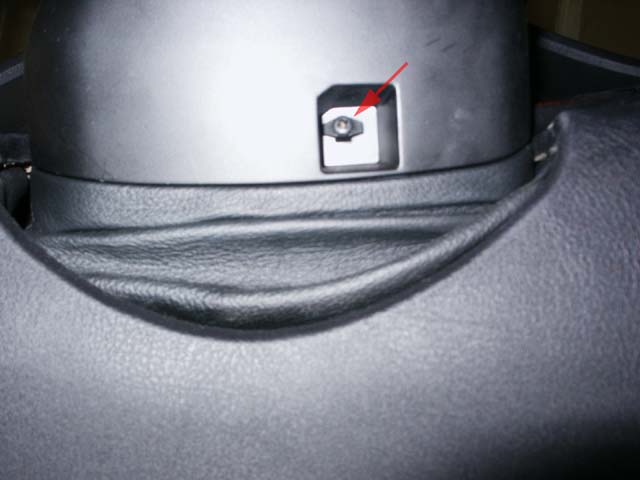
7. Remove the plastic phillips-head screw under the steering column.
This step is probably unnecessary for 03/99+ vehicles.
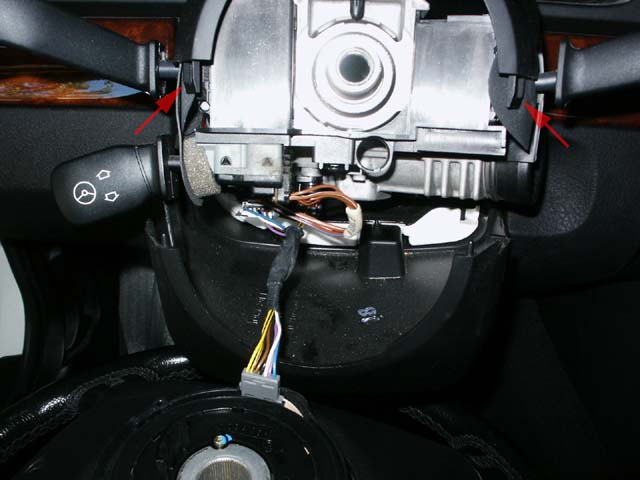
8. Pull straight out to partially remove the wheel. Enhance access to the steering
column connectors by pressing the upper column cover to release the tabs (see
arrows) and lower the bottom cover. These wires go to the slip-ring which is used
to maintain electrical contact to the wheel-mounted buttons and devices while
it is being turned.
On 03/99+ vehicles, I believe the slip-ring is incorporated into
the steering column, so unplug the remaining connector if removing an M-Sport
wheel and simply pull the wheel straight off. 03/99+ MF wheels should have no
remaining connections, and can be pulled right off.
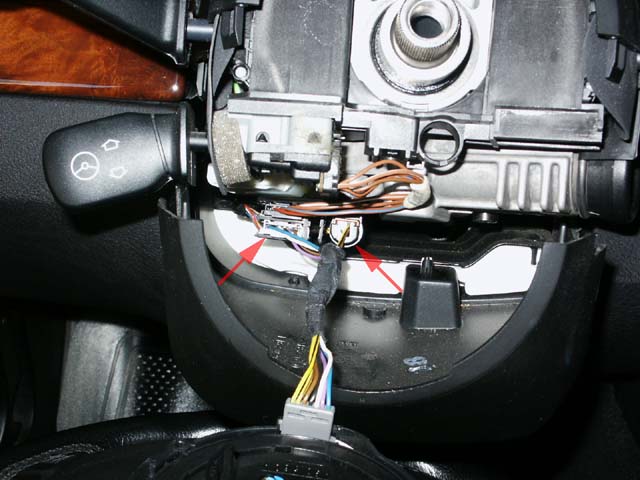
9. While still supporting the wheel, carefully unplug the two connectors by pulling
straight out to free the wheel. Use the flat-headed screwdriver to assist with
the connectors if needed. Don't let the steering wheel hang by the wires prior
to removal because the slip-ring tends to come apart easily.
This step is probably unnecessary for 03/99+ vehicles.
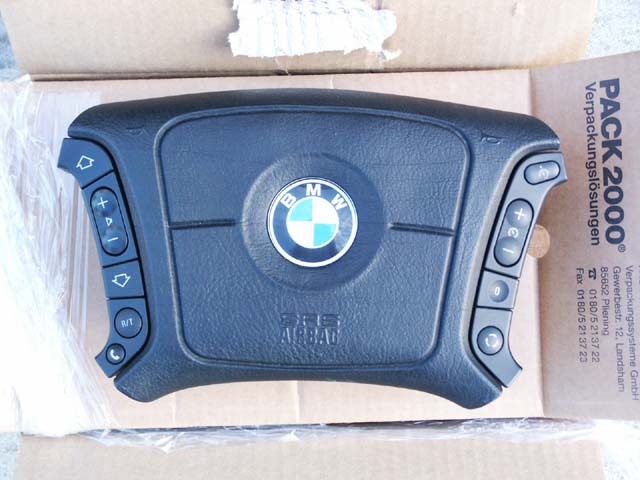
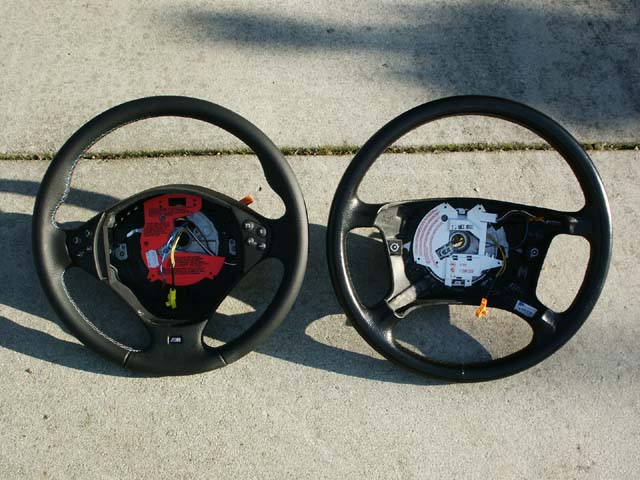
10. Take a moment to compare the two wheels side-by-side.
11. Press the white latch on the new steering wheel and spin the slip-ring carefully
in both directions to determine the center point which is a~2.5 turns from either
end-point.
On 03/99+ vehicles, if the wheels were straightened in Step 1,
the slip-ring should already be centered.
12. While supporting the new wheel, plug the two slip-ring wiring connectors back
into the steering column, and align and snap the column covers back together.
Install the new wheel by aligning and placing it onto the splined shaft. There
is a retaining pin that fits into a small notch on the back of the slip-ring to
ensure alignment. Torque the 17mm center bolt to 80Nm. I reused the original center
bolt, but a new bolt might be recommended. Re-install the plastic screw into the
bottom of the steering column with minimal force to avoid stripping.
On 03/99+ wheels, simply align and place the wheel on the splined
shaft while checking to be sure the two guide pins at 4:30 and 11:30 seat properly,
torque the 17mm center bolt to 80Nm, and plug in the hub connector for the button
pods and horn.
13. There's a metal hook (see red arrow) that prevents the airbag connector from
being inserted the wrong direction. My plug installed with the wires pointing
downwards (bottom yellow arrow). Plug in the horn wire (top yellow arrow), place
the airbag in the appropriate location in the wheel, and proceed to torque the
airbag Torx bolts to 8Nm for single-stage, and 2Nm for dual-stage airbags.
03/99+ dual-stage airbags have one keyed connector running from
the airbag to the hub area, so there is no metal hook necessary on the back. Simply
plug in the connector and torque the Torx bolts to 2Nm.
14. Reconnect the battery and check for functionality. In some instances, I've
read the airbag light will illuminate until a dealer resets it. Bob B and I had
no such issues. Any warning lights should be taken seriously and investigated
immediately since this is a critical safety device.
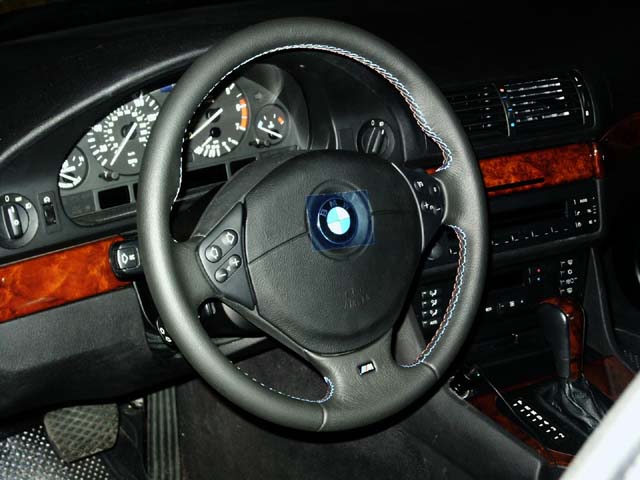
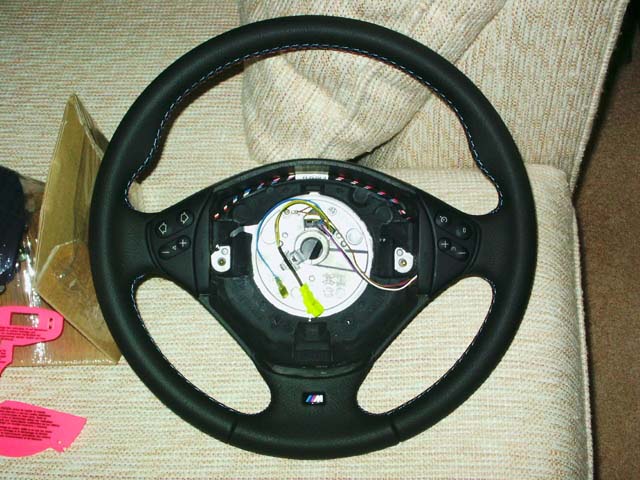
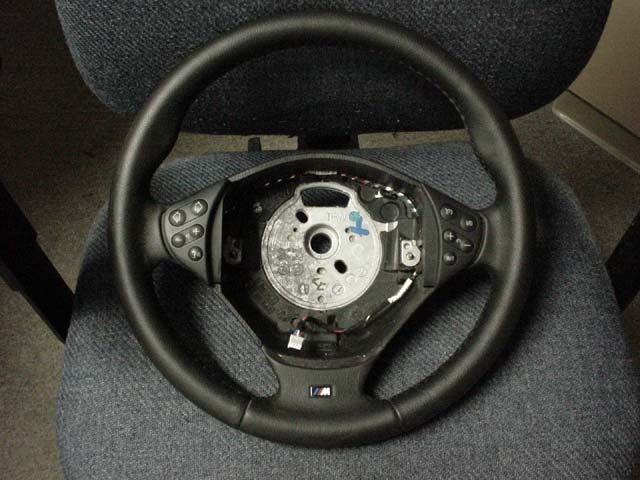
There are numerous structural, SRS control, and safety concerns with trying to
mount or adapt dual-stage airbags and wheels onto vehicles designed for the single-stage
system. As much as I would have loved to see my pre-03/99 airbag mated to the
09/99+ wheel, the slip-ring location, wiring connectors, and guide pin differences
helped me decide to play it safe. The two pics below clearly illustrate some of
these differences. Top pic is my wheel, bottom pic is the smaller new-style wheel.
If you are like me, and are considering selling your old MF wheel and airbag,
keep in mind that the airbag contains a gas-generator and must be handled carefully.
Before shipping, ask the carrier if they have any rules regarding this type of
freight.
| Questions? Comments? E-mail me:
|  . .
|
Optimized
for 800x600 or higher resolution.
Copyright © Midnight Designs, 2002. All Rights Reserved. All images and
registered trademarks are used to benefit and without intent to infringe on
the holder. Contents Subject to Change Without Notice.