BMW
E39 M-Sport Steering Wheel
Side Pod Replacement
Vehicle 1999 540iA Sport
Prepared
by Scott540i
Created: 10 January 2003
Additions and corrections encouraged
NOTE: Perform these steps at your own risk. All P/Ns listed are a "best guess", so please double-check with your local dealer. This repair was performed on my US-Spec 1999 540iA (6/99 prod date) and is provided for entertainment purposes only! (Thank you to Vietsb for the advice and wording here and throughout the document!)
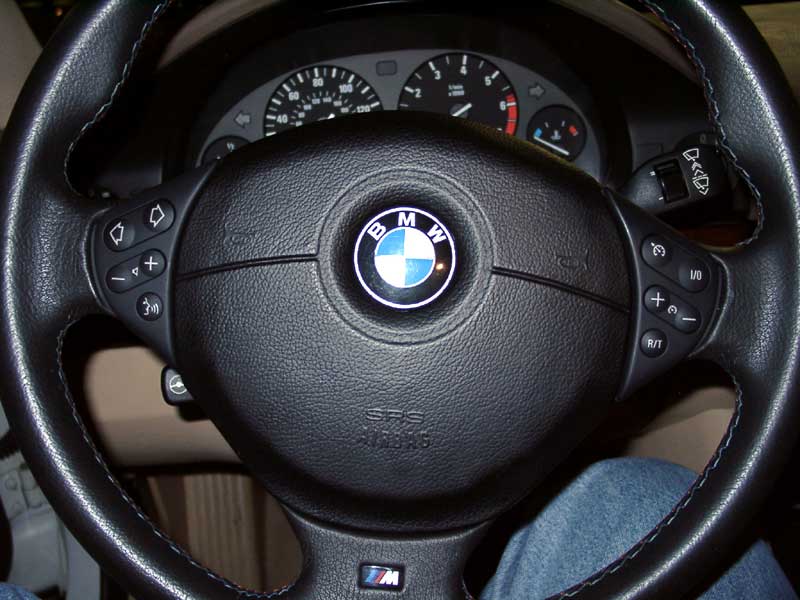
BACKGROUND: When I purchased my 1999 540iA I was disappointed by the condition of the buttons on the right and left side of the steering wheel. The wheel itself was very nice with tri-colored stitching, 3 spokes and the M logo at the 6 o’clock position. The paint around the buttons was chipping and the buttons themselves worn and dis-colored from use.
While the vehicle was still under both the new car and CPO warranty, BMW chose not to correct this problem under warranty calling it “normal use”. I have heard of others who have successfully had these cosmetic problems corrected at no cost – I was not fortunate enough to rate this treatment.
Based heavily on the research and write up by Vietsb on the retro-fit of his vehicle with an M Sport Steering Wheel, I began the process of replacing my worn pods.
My listing on BMWTIPS.com’s E39 forum resulting in many helpful suggestions. One was a response provided by Mike Ernst who provided a diagram of what turned out to be my model M Sport wheel.
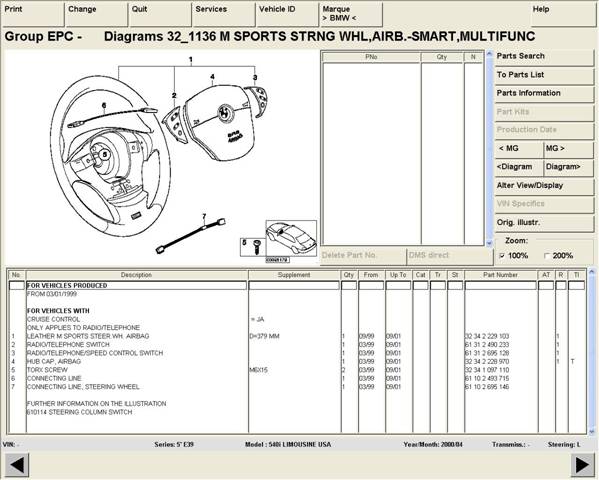
There appears
to be several versions of the M Sport wheel as I learned upon calling and visiting
my local dealer. At first they pulled up diagram 32_1234 which looked very similar
to Diagram 32_1136 show above with one major difference – each pod had 2 buttons
rather than three. As my car had three buttons on each pod, I stopped researching
Diagram 32_1234 so do not have the part numbers for that style.
(There was a great deal of confusion by my counting of 5 buttons on each pod. There are in fact 2 rocker buttons and one solo button on each pod. The Left Pod has the Station up/Down rocker, volume up/down rocker and the hand free telephone solo button. The Left Pod has the controls for the cruise control. The dealer counted 3 buttons on each pod, treating the rockers as one button. I counted 5 buttons, treating the rockers as two buttons. They are in fact the same thing.) If you are unsure of the part numbers, you can follow the instructions below to remove the old Pods. On the back of each is the part number. I believe they all start 61.31-

One nice and unexpected finding was that the new Pods are made of a tougher, rubber material rather than the harder painted plastic of the old Pods. I’m unsure when these changed but given the condition of my old Pods in only 3 years, I understand why BMW changed. Hopefully you can see the difference in the image below.

REQUIRED PARTS:
REQUIRED TOOLS:
PROCESS:
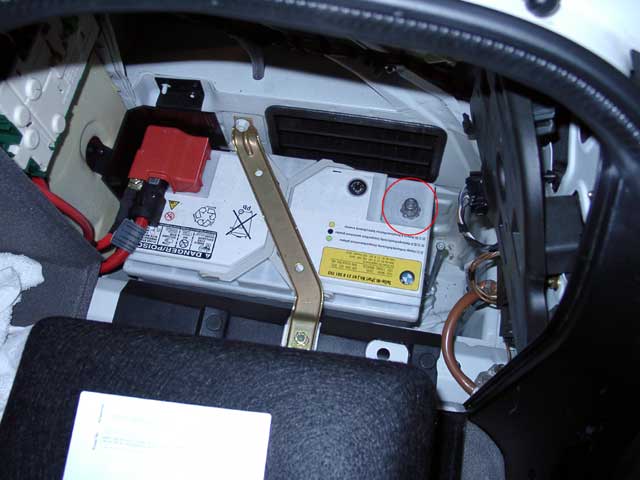
Step One - Disconnect the negative lead on the battery. I found my battery needed a 10mm socket rather than the 13mm others have mentioned in their write-ups.
Step Two - Loosen the (2) T-27 Torx screws located on the back of the wheel until the airbag is free. Note that the screws will not come out - they are sunk into the back of the steering wheel. As the screws are loosened, the airbag/horn module in the center of the wheel will come free so keep a hand on it as you loosen the screws.

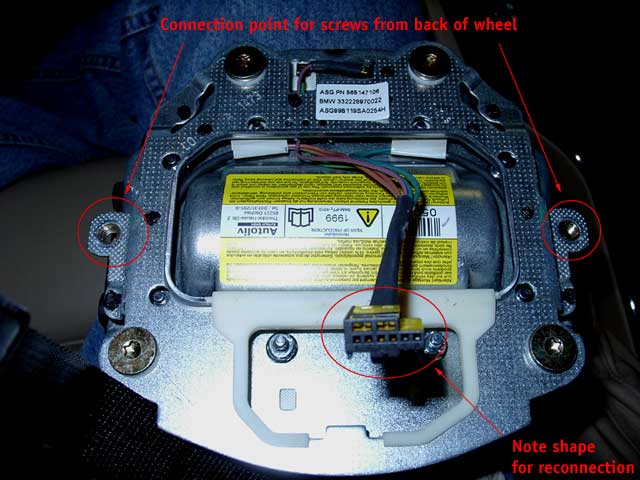
Step Three - Slowly move the Airbag/Horn module away from the wheel until you can see and reach the cable attached behind. This cable disconnects by squeezing the top tab down and pulling the connector out. (Red circle on picture.) Always handle the airbag very carefully and store it with the face (BMW emblem) pointing upwards and nothing lying on top of it. In the event of an accidental deployment, you don't want it flying to the ceiling or launching a screwdriver at you.

Step Four - You can start with either Pod as they work much the same way. I started with the Left Pod. The steering wheel is made of a flexible rubber material (left picture) and the Pods attach with four small feet that stick into the wheel in pre-determined holes. Please note that the next 2 images are out of sequence and designed to show you how the system works.


The easiest way to remove a Pod is to gently place a flathead screwdriver between the Pod and the outer ring of the wheel (there is a little space) the smaller the screwdriver the better. The Pod is quite deep so you will need to drive the screwdriver down to get behind the Pod.

Gently pry the outer edge of the Pod from the wheel. It should move easily.

Once the two feet on the outer edge have come loose, you should be able to grab the Pod and begin gently rocking while pulling away from the wheel. Do not try to pull the Pod off by continuing the rotation that the screwdriver started (outer edge over inner edge) – this will break the inner feet! It is much better to square the Pod to the wheel once the outer feet are loose and pull directly away from the wheel.

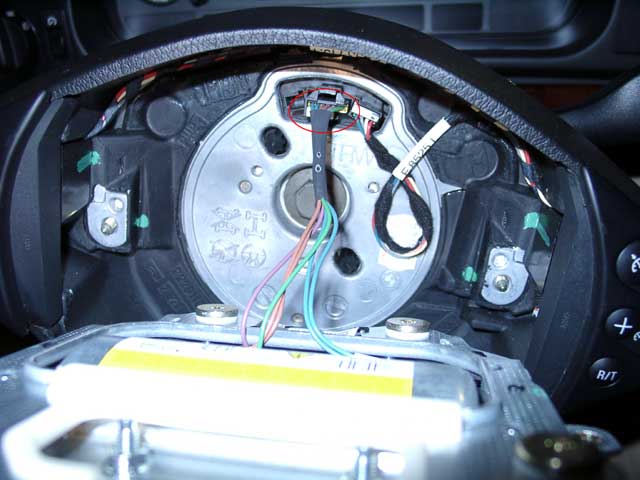
You will see that the Left Pod is connected with one cable. (The Right is connected with two.) Simply detach the cable, swap the old Pod for the new replacement and reconnect the cable. The cable is designed to fit on only one way so do not force it. Note: I have circled in red two of the four feet for reference only.

Install the new Pod in the opposite manner as it was removed. Line up the inner feet with the two holes in the wheel and press firmly until they sink in.

Make sure that the cable is in the small channel at the rear, top area where the Pod and back of the wheel come together. Also, ensure the cable is in the channel that runs from one Pod to the other across the top of the center section of the wheel. (Highlighted by arrows in picture).
Step
Five
- Repeat the same procedure for the Right Pod. Gently place a flathead screwdriver
between the Pod and the outer ring of the wheel (there is a little space) the
smaller the screwdriver the better. The Pod is quite deep so you will need to
drive the screwdriver down to get behind the Pod.

Gently pry the outer edge of the Pod from the wheel. It should move easily.

Once the two feet on the outer edge have come loose, you should be able to grab the Pod and begin gently rocking while pulling away from the wheel. Do not try to pull the Pod off by continuing the rotation that the screwdriver started (outer edge over inner edge) – this will break the inner feet! It is much better to square the Pod to the wheel once the outer feet are loose and pull directly away from the wheel.

The only difference is that the Right Pod has two cables – one red like the Left Pod and one white. Take note to ensure that you place the proper cable in the proper slot on the new Pod. To make this easier, the two cables have different shapes. Simply detach the cables, swap the old Pod for the new replacement and reconnect the cables. The cables are all designed to fit on only one way so do not force them.

Install
the new Pod in the opposite manner as it was removed. Line up the inner feet
with the two holes in the wheel and press firmly until they sink in. 
Make sure that the cables are in the small channel at the rear, top area where the Pod and back of the wheel come together.

Also, ensure the cable with the red connector is in the channel that runs from one Pod to the other across the top of the center section of the wheel (marked by #1 arrows). The Cable with the white connector should connect to the center top of the wheel next to where the Airbag/Horn module connected (#2 arrow). There is no reason to disconnect this side of the cable but you should know where it connects.

Step Six - Reconnect the Airbag/Horn module. Again, use care when handling the Airbag. Simply connect the cable to the center receptor and center the module onto the screws.
Line the screws up with the threaded holes on the back of the airbag/horn module. While holding the module, tighten the screws from the back of the wheel. The screws will pull the module into place.
Step Seven - Reconnect the battery – Test the buttons and controls. You’re done!