Does your E39 have this problem?


                                        By rsmillar


Several days ago (today is Friday, August 30, 2002), Jim Cash posted a message on the RoadFly E39 message board regarding the cover over the E-box, and how it is critical to ensure this cover is correctly installed.  I'd had this very cover off during a routine inspection several months ago, and Jim's post made me wonder...  so I went out to the car to inspect my work.

As it turned out, I had replaced the E-box cover correctly: however, I noticed something else that seemed an even worse situation.  The upper cowl piece, right where the harness ducting from the motor enters the cowl, had begun to disintegrate, preventing the ducting from making a tight seal to the cowl.

When I purchased a replacement cowl piece, I was told that several of these pieces had been used by the service department in the last few months alone.  So I began to think I might not be the only one with this problem.  Hence this page (and page 2, too).  My 540 is a 1997 year-model, with only 45k miles.  I have no idea why this piece disintegrated, but it must be due to heat.

Parts Needed:  New cowl p/n 51-71-8-157-446 (check w/ your dealer to verify!), $26.00.  One small screwdriver.

Total time to complete replacement: 50 minutes.

Many thanks to Jim Cash for his help: for leading me to this discovery in the first place; for educating me as to what that "black flex hose" really does; and for helping me find the correct part number in the %$# ETK...


  This is the view every 540i owner sees when he/she opens the hood.

See anything wrong?  I didn't until looking for the issue mentioned above.  The arrow in this pic shows the damage as visible from this perspective.  Not very obvious, is it?

     
  Ah-ha!  A little more apparent now - you can see a misalignment where the rubber harness ducting enters the cowl.
     
  Holy COW!!!  This is starting to look sort of scary.  At this point, when prodding this area with my finger, pieces of the cowl were falling off onto the ground...
     
  Removal of the cowl piece is easy.  Start by carefully lifting the seal away from the cowl.  You don't need to completely remove the seal (and in fact mine is glued at either end) - you just need to lift it away enough for access to the top edge of the cowl piece.

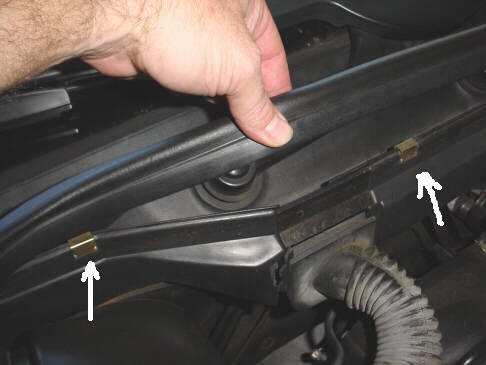
There are a total of seven fasteners holding the cowl on: three brass clips, two of which are shown, along the top edge, and four quick-release cam clips along the bottom edge.

     
  A small screwdriver is the only tool you'll need for this entire operation.  Carefully pry each of the three clips off.  DON'T LET THEM FALL DOWN INTO THE MOTOR AREA!
     
  For access to the four quick-release clips, both airbox ducts must be removed.  This is the driver's side duct.  First unhook the strap, grasp the duct, and carefully rotate it CCW (CW for the other side) about 20 degrees.  It will come off easily once you have disengaged the retainers (see below).
     
  This pic simply shows how each duct is held on to the cowl.  Hopefully this will give you a mind's-eye view of how to get them off.
     
  Here's one of the four cam clips.  This one is down in the corner on the passenger side (US-spec 540!).  There is a corresponding one on the driver's side, and two along the center section (see pic of new part below for locations).

To remove these clips, simply rotate them 90 degrees either way, so that the "handle" is horizontal.  They will then come right out.

To reinstall - insert firmly with handle in horizontal position, then twist 90 degrees.  You will feel them "snap" into locked position.

     
  Here's the center-left clip...
     
  And finally, the center-right clip.
     
  This fastener is simply pulled straight up to remove (note: this pic is actually of the new part...).
     
  Removal of the cowl - you must dislodge the two ends of the part from behind each airbox.  Once the part is loose, carefully rotate CCW as shown.  Be careful not to place stress on the harness duct (light grey flex hose on left side of pic).  Finally, pull the part up to the right, continuing to take care around the harness.


Click link below for next page.

     
Here's a reference pic of the area behind the cowl (if you've ever wanted to know what's going on back there...).
Another (really bad) reference pic...
Close-up of the damaged area.  Looks like the part failed due to heat - it was very brittle and crumbled to the touch.
More damage was occurring - this crack traveled nearly the entire height of the old cowl part.

Your part might be at this stage with no greater damage, so inspect it carefully.

Here's the old part in all its glory...
...and its replacement.  Arrows show the seven attachment locations.
Installation.  First maneuver the new part into general position, then carefully ensure the ends are BEHIND the airbox assembly on each side, and above the circular air-inlet seal.  You can use the cam-clip holes to check alignment.  You should not have to hold the part into position - if you do, it's not yet located correctly.

Always take care around the harness!

Once the cowl is correctly positioned, clip the three brass clips into place (you will see marks on the back side of the rear-half of the cowl to see where to put them), snap-in the four cam clips, and install the harness-duct retainer.
OOPS!  When I started reinstalling the airbox ducts, I noticed one of the seals had come unseated.  The arrow is pointing to the area where one of the retainers had come unsnapped (see next pic).
Other side of the duct - the left arrow shows a gasket retainer (much like the retainers on a big-block Chrysler valve cover gasket :) ) in the correct position, the right arrow shows the one that has pulled out.
Install the ducts in the reverse of disassembly (don't you hate that?).  MAKE SURE to seat them correctly - this was what started this whole project in the first place!

Firmly replace the seal running along the top edge of the cowl.  Almost done...

This is how it is supposed to look...
And finally, all buttoned up and looking sharp.

If you have any questions, I can be reached via email here.